<?xml version="1.0" encoding="UTF-8"?>
<feed xmlns="http://www.w3.org/2005/Atom">

  <title>Articles tagged opengl at null program</title>
  <link rel="alternate" type="text/html"
        href="https://nullprogram.com/tags/opengl/"/>
  <link rel="self" type="application/atom+xml"
        href="https://nullprogram.com/tags/opengl/feed/"/>
  <updated>2026-04-09T13:25:45Z</updated>
  <id>urn:uuid:90c6162f-52ec-4018-b490-acd91621dc9a</id>

  <author>
    <name>Christopher Wellons</name>
    <uri>https://nullprogram.com</uri>
    <email>wellons@nullprogram.com</email>
  </author>


  <entry>
    <title>When Parallel: Pull, Don't Push</title>
    <link rel="alternate" type="text/html" href="https://nullprogram.com/blog/2020/04/30/"/>
    <id>urn:uuid:ac12ef1d-299f-4edb-9eb1-5ed4dac1219c</id>
    <updated>2020-04-30T22:35:51Z</updated>
    <category term="optimization"/><category term="interactive"/><category term="javascript"/><category term="opengl"/><category term="media"/><category term="webgl"/><category term="c"/>
    <content type="html">
      <![CDATA[<p><em>This article was discussed <a href="https://news.ycombinator.com/item?id=23089729">on Hacker News</a>.</em></p>

<p>I’ve noticed a small pattern across a few of my projects where I had
vectorized and parallelized some code. The original algorithm had a
“push” approach, the optimized version instead took a “pull” approach.
In this article I’ll describe what I mean, though it’s mostly just so I
can show off some pretty videos, pictures, and demos.</p>

<!--more-->

<h3 id="sandpiles">Sandpiles</h3>

<p>A good place to start is the <a href="https://en.wikipedia.org/wiki/Abelian_sandpile_model">Abelian sandpile model</a>, which, like
many before me, completely <a href="https://xkcd.com/356/">captured</a> my attention for awhile.
It’s a cellular automaton where each cell is a pile of grains of sand —
a sandpile. At each step, any sandpile with more than four grains of
sand spill one grain into its four 4-connected neighbors, regardless of
the number of grains in those neighboring cell. Cells at the edge spill
their grains into oblivion, and those grains no longer exist.</p>

<p>With excess sand falling over the edge, the model eventually hits a
stable state where all piles have three or fewer grains. However, until
it reaches stability, all sorts of interesting patterns ripple though
the cellular automaton. In certain cases, the final pattern itself is
beautiful and interesting.</p>

<p>Numberphile has a great video describing how to <a href="https://www.youtube.com/watch?v=1MtEUErz7Gg">form a group over
recurrent configurations</a> (<a href="https://www.youtube.com/watch?v=hBdJB-BzudU">also</a>). In short, for any given grid
size, there’s a stable <em>identity</em> configuration that, when “added” to
any other element in the group will stabilize back to that element. The
identity configuration is a fractal itself, and has been a focus of
study on its own.</p>

<p>Computing the identity configuration is really just about running the
simulation to completion a couple times from certain starting
configurations. Here’s an animation of the process for computing the
64x64 identity configuration:</p>

<p><a href="https://nullprogram.com/video/?v=sandpiles-64"><img src="/img/identity-64-thumb.png" alt="" /></a></p>

<p>As a fractal, the larger the grid, the more self-similar patterns there
are to observe. There are lots of samples online, and the biggest I
could find was <a href="https://commons.wikimedia.org/wiki/File:Sandpile_group_identity_on_3000x3000_grid.png">this 3000x3000 on Wikimedia Commons</a>. But I wanted
to see one <em>that’s even bigger, damnit</em>! So, skipping to the end, I
eventually computed this 10000x10000 identity configuration:</p>

<p><a href="/img/identity-10000.png"><img src="/img/identity-10000-thumb.png" alt="" /></a></p>

<p>This took 10 days to compute using my optimized implementation:</p>

<p><a href="https://github.com/skeeto/scratch/blob/master/animation/sandpiles.c">https://github.com/skeeto/scratch/blob/master/animation/sandpiles.c</a></p>

<p>I picked an algorithm described <a href="https://codegolf.stackexchange.com/a/106990">in a code golf challenge</a>:</p>

<div class="language-plaintext highlighter-rouge"><div class="highlight"><pre class="highlight"><code>f(ones(n)*6 - f(ones(n)*6))
</code></pre></div></div>

<p>Where <code class="language-plaintext highlighter-rouge">f()</code> is the function that runs the simulation to a stable state.</p>

<p>I used <a href="/blog/2015/07/10/">OpenMP to parallelize across cores, and SIMD to parallelize
within a thread</a>. Each thread operates on 32 sandpiles at a time.
To compute the identity sandpile, each sandpile only needs 3 bits of
state, so this could potentially be increased to 85 sandpiles at a time
on the same hardware. The output format is my old mainstay, Netpbm,
<a href="/blog/2017/11/03/">including the video output</a>.</p>

<h4 id="sandpile-push-and-pull">Sandpile push and pull</h4>

<p>So, what do I mean about pushing and pulling? The naive approach to
simulating sandpiles looks like this:</p>

<div class="language-plaintext highlighter-rouge"><div class="highlight"><pre class="highlight"><code>for each i in sandpiles {
    if input[i] &lt; 4 {
        output[i] = input[i]
    } else {
        output[i] = input[i] - 4
        for each j in neighbors {
            output[j] = output[j] + 1
        }
    }
}
</code></pre></div></div>

<p>As the algorithm examines each cell, it <em>pushes</em> results into
neighboring cells. If we’re using concurrency, that means multiple
threads of execution may be mutating the same cell, which requires
synchronization — locks, <a href="/blog/2014/09/02/">atomics</a>, etc. That much
synchronization is the death knell of performance. The threads will
spend all their time contending for the same resources, even if it’s
just false sharing.</p>

<p>The solution is to <em>pull</em> grains from neighbors:</p>

<div class="language-plaintext highlighter-rouge"><div class="highlight"><pre class="highlight"><code>for each i in sandpiles {
    if input[i] &lt; 4 {
        output[i] = input[i]
    } else {
        output[i] = input[i] - 4
    }
    for each j in neighbors {
        if input[j] &gt;= 4 {
            output[i] = output[i] + 1
        }
    }
}
</code></pre></div></div>

<p>Each thread only modifies one cell — the cell it’s in charge of updating
— so no synchronization is necessary. It’s shader-friendly and should
sound familiar if you’ve seen <a href="/blog/2014/06/10/">my WebGL implementation of Conway’s Game
of Life</a>. It’s essentially the same algorithm. If you chase down
the various Abelian sandpile references online, you’ll eventually come
across a 2017 paper by Cameron Fish about <a href="http://people.reed.edu/~davidp/homepage/students/fish.pdf">running sandpile simulations
on GPUs</a>. He cites my WebGL Game of Life article, bringing
everything full circle. We had spoken by email at the time, and he
<a href="https://people.reed.edu/~davidp/web_sandpiles/">shared his <strong>interactive simulation</strong> with me</a>.</p>

<p>Vectorizing this algorithm is straightforward: Load multiple piles at
once, one per SIMD channel, and use masks to implement the branches. In
my code I’ve also unrolled the loop. To avoid bounds checking in the
SIMD code, I pad the state data structure with zeros so that the edge
cells have static neighbors and are no longer special.</p>

<h3 id="webgl-fire">WebGL Fire</h3>

<p>Back in the old days, one of the <a href="http://fabiensanglard.net/doom_fire_psx/">cool graphics tricks was fire
animations</a>. It was so easy to implement on limited hardware. In
fact, the most obvious way to compute it was directly in the
framebuffer, such as in <a href="/blog/2014/12/09/">the VGA buffer</a>, with no outside state.</p>

<p>There’s a heat source at the bottom of the screen, and the algorithm
runs from bottom up, propagating that heat upwards randomly. Here’s the
algorithm using traditional screen coordinates (top-left corner origin):</p>

<div class="language-plaintext highlighter-rouge"><div class="highlight"><pre class="highlight"><code>func rand(min, max) // random integer in [min, max]

for each x, y from bottom {
    buf[y-1][x+rand(-1, 1)] = buf[y][x] - rand(0, 1)
}
</code></pre></div></div>

<p>As a <em>push</em> algorithm it works fine with a single-thread, but
it doesn’t translate well to modern video hardware. So convert it to a
<em>pull</em> algorithm!</p>

<div class="language-plaintext highlighter-rouge"><div class="highlight"><pre class="highlight"><code>for each x, y {
    sx = x + rand(-1, 1)
    sy = y + rand(1, 2)
    output[y][x] = input[sy][sx] - rand(0, 1)
}
</code></pre></div></div>

<p>Cells pull the fire upward from the bottom. Though this time there’s a
catch: <em>This algorithm will have subtly different results.</em></p>

<ul>
  <li>
    <p>In the original, there’s a single state buffer and so a flame could
propagate upwards multiple times in a single pass. I’ve compensated
here by allowing a flames to propagate further at once.</p>
  </li>
  <li>
    <p>In the original, a flame only propagates to one other cell. In this
version, two cells might pull from the same flame, cloning it.</p>
  </li>
</ul>

<p>In the end it’s hard to tell the difference, so this works out.</p>

<p><a href="https://nullprogram.com/webgl-fire/"><img src="/img/fire-thumb.png" alt="" /></a></p>

<p><a href="https://github.com/skeeto/webgl-fire/">source code and instructions</a></p>

<p>There’s still potentially contention in that <code class="language-plaintext highlighter-rouge">rand()</code> function, but this
can be resolved <a href="https://www.shadertoy.com/view/WttXWX">with a hash function</a> that takes <code class="language-plaintext highlighter-rouge">x</code> and <code class="language-plaintext highlighter-rouge">y</code> as
inputs.</p>

]]>
    </content>
  </entry>


  <entry>
    <title>Two Chaotic Motion Demos</title>
    <link rel="alternate" type="text/html" href="https://nullprogram.com/blog/2018/02/15/"/>
    <id>urn:uuid:5b76d549-b253-355b-391b-cfdc25d2b056</id>
    <updated>2018-02-15T04:18:07Z</updated>
    <category term="javascript"/><category term="interactive"/><category term="webgl"/><category term="opengl"/>
    <content type="html">
      <![CDATA[<p>I’ve put together two online, interactive, demonstrations of <a href="https://en.wikipedia.org/wiki/Chaos_theory">chaotic
motion</a>. One is 2D and the other is 3D, but both are rendered
using <a href="/blog/2013/06/10/">WebGL</a> — which, for me, is the most interesting part.
Both are governed by ordinary differential equations. Both are
integrated using the <a href="https://en.wikipedia.org/wiki/Runge–Kutta_methods">Runge–Kutta method</a>, specifically RK4.</p>

<p>Far more knowledgeable people have already written introductions for
chaos theory, so here’s just a quick summary. A chaotic system is
deterministic but highly sensitive to initial conditions. Tweaking a
single bit of the starting state of either of my demos will quickly
lead to two arbitrarily different results. Both demonstrations have
features that aim to show this in action.</p>

<p>This ain’t my first chaotic system rodeo. About eight years ago I made
<a href="/blog/2010/10/16/">water wheel Java applet</a>, and that was based on some Matlab code I
collaborated on some eleven years ago. I really hope you’re not equipped
to run a crusty old Java applet in 2018, though. (<strong>Update</strong>: <a href="https://github.com/skeeto/waterwheel">now
upgraded to HTML5 Canvas</a>.)</p>

<p>If you want to find either of these demos again in the future, you
don’t need to find this article first. They’re both listed in my
<a href="/toys/">Showcase page</a>, linked from the header of this site.</p>

<h3 id="double-pendulum">Double pendulum</h3>

<p>First up is the classic <a href="https://en.wikipedia.org/wiki/Double_pendulum">double pendulum</a>. This one’s more intuitive
than my other demo since it’s modeling a physical system you could
actually build and observe in the real world.</p>

<p><a href="/double-pendulum/"><img src="/img/screenshot/double-pendulum.png" alt="" /></a></p>

<p>Source: <a href="https://github.com/skeeto/double-pendulum">https://github.com/skeeto/double-pendulum</a></p>

<p>I lifted the differential equations straight from the Wikipedia article
(<code class="language-plaintext highlighter-rouge">derivative()</code> in my code). Same for the Runge–Kutta method (<code class="language-plaintext highlighter-rouge">rk4()</code> in
my code). It’s all pretty straightforward. RK4 may not have been the
best choice for this system since it seems to bleed off energy over
time. If you let my demo run over night, by morning there will obviously
be a lot less activity.</p>

<p>I’m not a fan of buttons and other fancy GUI widgets — neither
designing them nor using them myself — prefering more cryptic, but
easy-to-use keyboard-driven interfaces. (Hey, it works well for
<a href="https://mpv.io/">mpv</a> and <a href="http://www.mplayerhq.hu/design7/news.html">MPlayer</a>.) I haven’t bothered with a mobile
interface, so sorry if you’re reading on your phone. You’ll just have
to enjoy watching a single pendulum.</p>

<p>Here are the controls:</p>

<ul>
  <li><kbd>a</kbd>: add a new random pendulum</li>
  <li><kbd>c</kbd>: imperfectly clone an existing pendulum</li>
  <li><kbd>d</kbd>: delete the most recently added pendulum</li>
  <li><kbd>m</kbd>: toggle between WebGL and Canvas rendering</li>
  <li><kbd>SPACE</kbd>: pause the simulation (toggle)</li>
</ul>

<p>To witness chaos theory in action:</p>

<ol>
  <li>Start with a single pendulum (the default).</li>
  <li>Pause the simulation (<kbd>SPACE</kbd>).</li>
  <li>Make a dozen or so clones (press <kbd>c</kbd> <a href="https://www.youtube.com/watch?v=Uk0mJSTatbw">for awhile</a>).</li>
  <li>Unpause.</li>
</ol>

<p>At first it will appear as single pendulum, but they’re actually all
stacked up, each starting from slightly randomized initial conditions.
Within a minute you’ll witness the pendulums diverge, and after a minute
they’ll all be completely different. It’s pretty to watch them come
apart at first.</p>

<p>It might appear that the <kbd>m</kbd> key doesn’t actually do
anything. That’s because the HTML5 Canvas rendering — which is what I
actually implemented first — is <em>really</em> close to the WebGL rendering.
I’m really proud of this. There are just three noticeable differences.
First, there’s a rounded line cap in the Canvas rendering where the
pendulum is “attached.” Second, the tail line segments aren’t properly
connected in the Canvas rendering. The segments are stroked separately
in order to get that gradient effect along its path. Third, it’s a lot
slower, particularly when there are many pendulums to render.</p>

<p><img src="/img/screenshot/canvas-indicators.png" alt="" /></p>

<p>In WebGL the two “masses” are rendered using that <a href="/blog/2017/11/03/#dot-rendering">handy old circle
rasterization technique</a> on a quad. Either a <a href="/blog/2014/06/01/">triangle fan</a>
or pre-rendering the circle as a texture would probably have been a
better choices. The two bars are the same quad buffers, just squeezed
and rotated into place. Both were really simple to create. It’s the
tail that was tricky to render.</p>

<p>When I wrote the original Canvas renderer, I set the super convenient
<code class="language-plaintext highlighter-rouge">lineWidth</code> property to get a nice, thick tail. In my first cut at
rendering the tail I used <code class="language-plaintext highlighter-rouge">GL_LINE_STRIP</code> to draw a line primitive.
The problem with the line primitive is that an OpenGL implementation
is only required to support single pixel wide lines. If I wanted
wider, I’d have to generate the geometry myself. So I did.</p>

<p>Like before, I wasn’t about to dirty my hands manipulating a
graphite-filled wooden stick on a piece of paper to solve this
problem. No, I lifted the math from something I found on the internet
again. In this case it was <a href="https://forum.libcinder.org/topic/smooth-thick-lines-using-geometry-shader#23286000001269127">a forum post by paul.houx</a>, which
provides a few vector equations to compute a triangle strip from a
line strip. My own modification was to add a miter limit, which keeps
sharp turns under control. You can find my implementation in
<code class="language-plaintext highlighter-rouge">polyline()</code> in my code. Here’s a close-up with the skeleton rendered
on top in black:</p>

<p><img src="/img/screenshot/tail-mesh.png" alt="" /></p>

<p>For the first time I’m also using ECMAScript’s new <a href="https://developer.mozilla.org/en-US/docs/Web/JavaScript/Reference/Template_literals">template
literals</a> to store the shaders inside the JavaScript source. These
string literals can contain newlines, but, even cooler, I it does
string interpolation, meaning I can embed JavaScript variables
directly into the shader code:</p>

<div class="language-javascript highlighter-rouge"><div class="highlight"><pre class="highlight"><code><span class="kd">let</span> <span class="nx">massRadius</span> <span class="o">=</span> <span class="mf">0.12</span><span class="p">;</span>
<span class="kd">let</span> <span class="nx">vertexShader</span> <span class="o">=</span> <span class="s2">`
attribute vec2 a_point;
uniform   vec2 u_center;
varying   vec2 v_point;

void main() {
    v_point = a_point;
    gl_Position = vec4(a_point * </span><span class="p">${</span><span class="nx">massRadius</span><span class="p">}</span><span class="s2"> + u_center, 0, 1);
}`</span><span class="p">;</span>
</code></pre></div></div>

<h4 id="allocation-avoidance">Allocation avoidance</h4>

<p>If you’ve looked at my code you might have noticed something curious.
I’m using a lot of <a href="https://developer.mozilla.org/en-US/docs/Web/JavaScript/Reference/Operators/Destructuring_assignment">destructuring assignments</a>, which is another
relatively new addition to ECMAScript. This was part of a little
experiment.</p>

<div class="language-javascript highlighter-rouge"><div class="highlight"><pre class="highlight"><code><span class="kd">function</span> <span class="nx">normalize</span><span class="p">(</span><span class="nx">v0</span><span class="p">,</span> <span class="nx">v1</span><span class="p">)</span> <span class="p">{</span>
    <span class="kd">let</span> <span class="nx">d</span> <span class="o">=</span> <span class="nb">Math</span><span class="p">.</span><span class="nx">sqrt</span><span class="p">(</span><span class="nx">v0</span> <span class="o">*</span> <span class="nx">v0</span> <span class="o">+</span> <span class="nx">v1</span> <span class="o">*</span> <span class="nx">v1</span><span class="p">);</span>
    <span class="k">return</span> <span class="p">[</span><span class="nx">v0</span> <span class="o">/</span> <span class="nx">d</span><span class="p">,</span> <span class="nx">v1</span> <span class="o">/</span> <span class="nx">d</span><span class="p">];</span>
<span class="p">}</span>

<span class="cm">/* ... */</span>

<span class="kd">let</span> <span class="p">[</span><span class="nx">nx</span><span class="p">,</span> <span class="nx">ny</span><span class="p">]</span> <span class="o">=</span> <span class="nx">normalize</span><span class="p">(</span><span class="o">-</span><span class="nx">ly</span><span class="p">,</span> <span class="nx">lx</span><span class="p">);</span>
</code></pre></div></div>

<p>One of my goals for this project was <strong>zero heap allocations in the
main WebGL rendering loop</strong>. There are <a href="https://i.imgur.com/ceqSpHg.jpg">no garbage collector hiccups
if there’s no garbage to collect</a>. This sort of thing is trivial
in a language with manual memory management, such as C and C++. Just
having value semantics for aggregates would be sufficient.</p>

<p>But with JavaScript I don’t get to choose how my objects are allocated.
I either have to pre-allocate everything, including space for all the
intermediate values (e.g. an object pool). This would be clunky and
unconventional. Or I can structure and access my allocations in such a
way that the JIT compiler can eliminate them (via escape analysis,
scalar replacement, etc.).</p>

<p>In this case, I’m trusting that JavaScript implementations will
flatten these destructuring assignments so that the intermediate array
never actually exists. It’s like pretending the array has value
semantics. This seems to work as I expect with V8, but not so well
with SpiderMonkey (yet?), at least in Firefox 52 ESR.</p>

<h4 id="single-precision">Single precision</h4>

<p>I briefly considered using <a href="https://developer.mozilla.org/en-US/docs/Web/JavaScript/Reference/Global_Objects/Math/fround"><code class="language-plaintext highlighter-rouge">Math.fround()</code></a> to convince
JavaScript to compute all the tail geometry in single precision. The
double pendulum system would remain double precision, but the geometry
doesn’t need all that precision. It’s all rounded to single precision
going out to the GPU anyway.</p>

<p>Normally when pulling values from a <code class="language-plaintext highlighter-rouge">Float32Array</code>, they’re cast to
double precision — JavaScript’s only numeric type — and all operations
are performed in double precision, even if the result is stored back
in a <code class="language-plaintext highlighter-rouge">Float32Array</code>. This is because the JIT compiler is required to
correctly perform all the <a href="https://possiblywrong.wordpress.com/2017/09/12/floating-point-agreement-between-matlab-and-c/">intermediate rounding</a>. To relax this
requirement, <a href="https://blog.mozilla.org/javascript/2013/11/07/efficient-float32-arithmetic-in-javascript/">surround each operation with a call to
<code class="language-plaintext highlighter-rouge">Math.fround()</code></a>. Since the result of doing each operation in
double precision with this rounding step in between is equivalent to
doing each operation in single precision, the JIT compiler can choose
to do the latter.</p>

<div class="language-javascript highlighter-rouge"><div class="highlight"><pre class="highlight"><code><span class="kd">let</span> <span class="nx">x</span> <span class="o">=</span> <span class="k">new</span> <span class="nb">Float32Array</span><span class="p">(</span><span class="nx">n</span><span class="p">);</span>
<span class="kd">let</span> <span class="nx">y</span> <span class="o">=</span> <span class="k">new</span> <span class="nb">Float32Array</span><span class="p">(</span><span class="nx">n</span><span class="p">);</span>
<span class="kd">let</span> <span class="nx">d</span> <span class="o">=</span> <span class="k">new</span> <span class="nb">Float32Array</span><span class="p">(</span><span class="nx">n</span><span class="p">);</span>
<span class="c1">// ...</span>
<span class="k">for</span> <span class="p">(</span><span class="kd">let</span> <span class="nx">i</span> <span class="o">=</span> <span class="mi">0</span><span class="p">;</span> <span class="nx">i</span> <span class="o">&lt;</span> <span class="nx">n</span><span class="p">;</span> <span class="nx">i</span><span class="o">++</span><span class="p">)</span> <span class="p">{</span>
    <span class="kd">let</span> <span class="nx">xprod</span> <span class="o">=</span> <span class="nb">Math</span><span class="p">.</span><span class="nx">fround</span><span class="p">(</span><span class="nx">x</span><span class="p">[</span><span class="nx">i</span><span class="p">]</span> <span class="o">*</span> <span class="nx">x</span><span class="p">[</span><span class="nx">i</span><span class="p">]);</span>
    <span class="kd">let</span> <span class="nx">yprod</span> <span class="o">=</span> <span class="nb">Math</span><span class="p">.</span><span class="nx">fround</span><span class="p">(</span><span class="nx">y</span><span class="p">[</span><span class="nx">i</span><span class="p">]</span> <span class="o">*</span> <span class="nx">y</span><span class="p">[</span><span class="nx">i</span><span class="p">]);</span>
    <span class="nx">d</span><span class="p">[</span><span class="nx">i</span><span class="p">]</span> <span class="o">=</span> <span class="nb">Math</span><span class="p">.</span><span class="nx">sqrt</span><span class="p">(</span><span class="nb">Math</span><span class="p">.</span><span class="nx">fround</span><span class="p">(</span><span class="nx">xprod</span> <span class="o">+</span> <span class="nx">yprod</span><span class="p">));</span>
<span class="p">}</span>
</code></pre></div></div>

<p>I ultimately decided not to bother with this since it would
significantly obscures my code for what is probably a minuscule
performance gain (in this case). It’s also really difficult to tell if
I did it all correctly. So I figure this is better suited for
compilers that target JavaScript rather than something to do by hand.</p>

<h3 id="lorenz-system">Lorenz system</h3>

<p>The other demo is a <a href="https://en.wikipedia.org/wiki/Lorenz_system">Lorenz system</a> with its famous butterfly
pattern. I actually wrote this one a year and a half ago but never got
around to writing about it. You can tell it’s older because I’m still
using <code class="language-plaintext highlighter-rouge">var</code>.</p>

<p><a href="/lorenz-webgl/"><img src="/img/screenshot/lorenz-webgl.png" alt="" /></a></p>

<p>Source: <a href="https://github.com/skeeto/lorenz-webgl">https://github.com/skeeto/lorenz-webgl</a></p>

<p>Like before, the equations came straight from the Wikipedia article
(<code class="language-plaintext highlighter-rouge">Lorenz.lorenz()</code> in my code). They math is a lot simpler this time,
too.</p>

<p>This one’s a bit more user friendly with a side menu displaying all
your options. The keys are basically the same. This was completely by
accident, I swear. Here are the important ones:</p>

<ul>
  <li><kbd>a</kbd>: add a new random solution</li>
  <li><kbd>c</kbd>: clone a solution with a perturbation</li>
  <li><kbd>C</kbd>: remove all solutions</li>
  <li><kbd>SPACE</kbd>: toggle pause/unpause</li>
  <li>You can click, drag, and toss it to examine it in 3D</li>
</ul>

<p>Witnessing chaos theory in action is the same process as before: clear
it down to a single solution (<kbd>C</kbd> then <kbd>a</kbd>), then add
a bunch of randomized clones (<kbd>c</kbd>).</p>

<p>There is no Canvas renderer for this one. It’s pure WebGL. The tails are
drawn using <code class="language-plaintext highlighter-rouge">GL_LINE_STRIP</code>, but in this case it works fine that they’re
a single pixel wide. If heads are turned on, those are just <code class="language-plaintext highlighter-rouge">GL_POINT</code>.
The geometry is threadbare for this one.</p>

<p>There is one notable feature: <strong>The tails are stored exclusively in
GPU memory</strong>. Only the “head” is stored CPU-side. After it computes
the next step, it updates a single spot of the tail with
<code class="language-plaintext highlighter-rouge">glBufferSubData()</code>, and the VBO is actually a circular buffer. OpenGL
doesn’t directly support rendering from circular buffers, but it
<em>does</em> have element arrays. An element array is an additional buffer
of indices that tells OpenGL what order to use the elements in the
other buffers.</p>

<p>Naively would mean for a tail of 4 segments, I need 4 different
element arrays, one for each possible rotation:</p>

<div class="language-plaintext highlighter-rouge"><div class="highlight"><pre class="highlight"><code>array 0: 0 1 2 3
array 1: 1 2 3 0
array 2: 2 3 0 1
array 3: 3 0 1 2
</code></pre></div></div>

<p>With the knowledge that element arrays can start at an offset, and
with a little cleverness, you might notice these can all overlap in a
single, 7-element array:</p>

<div class="language-plaintext highlighter-rouge"><div class="highlight"><pre class="highlight"><code>0 1 2 3 0 1 2
</code></pre></div></div>

<p>Array 0 is at offset 0, array 1 is at offset 1, array 2 is at offset 2,
and array 3 is at offset 3. The tails in the Lorenz system are drawn
using <code class="language-plaintext highlighter-rouge">drawElements()</code> with exactly this sort of array.</p>

<p>Like before, I was very careful to produce zero heap allocations in the
main loop. The FPS counter generates some garbage in the DOM due to
reflow, but this goes away if you hide the help menu (<kbd>?</kbd>). This
was long enough ago that destructuring assignment wasn’t available, but
Lorenz system and rendering it were so simple that using pre-allocated
objects worked fine.</p>

<p>Beyond just the programming, I’ve gotten hours of entertainment
playing with each of these systems. This was also the first time I’ve
used WebGL in over a year, and this project was a reminder of just how
working with it is so pleasurable. <a href="https://www.khronos.org/registry/webgl/specs/1.0/">The specification</a> is
superbly written and serves perfectly as its own reference.</p>

]]>
    </content>
  </entry>


  <entry>
    <title>Minimal OpenGL 3.3 Core Profile Demo</title>
    <link rel="alternate" type="text/html" href="https://nullprogram.com/blog/2015/06/06/"/>
    <id>urn:uuid:ada32e48-ae67-3da5-9772-7e61fee602c3</id>
    <updated>2015-06-06T19:35:34Z</updated>
    <category term="opengl"/><category term="c"/>
    <content type="html">
      <![CDATA[<p>When I was first attempting to learn OpenGL years ago, what I really
wanted was a complete, minimal example program. OpenGL has enormous
flexibility and I wanted to <a href="http://www.skorks.com/2010/04/on-the-value-of-fundamentals-in-software-development/">fully understand the fundamentals</a>
in isolation before moving on to more advanced features. I had been
advised to specifically learn <em>core profile</em>, which drops nearly all
the legacy parts of the API.</p>

<p>However, since much of the OpenGL-related content to be found online,
even today, <a href="http://www.shamusyoung.com/twentysidedtale/?p=23079">is outdated</a> — and, worse, it’s not marked as
such — good, modern core profile examples have been hard to come by.
The relevant examples I could find at the time were more complicated
than necessary, due to the common problem that full 3D graphics are
too closely conflated with OpenGL. The examples would include matrix
libraries, texture loading, etc. This is a big reason I ended up
<a href="/blog/2013/06/10/">settling on WebGL</a>: a clean slate in a completely different
community. (The good news is that this situation has already improved
dramatically over the last few years!)</p>

<p>Until recently, <a href="/tags/webgl/">all of my OpenGL experience had been WebGL</a>.
Wanting to break out of that, earlier this year I set up a minimal
OpenGL 3.3 core profile demo in C, using <a href="http://www.glfw.org/">GLFW</a> and
<a href="https://github.com/skaslev/gl3w">gl3w</a>. You can find it here:</p>

<ul>
  <li><a href="https://github.com/skeeto/opengl-demo">https://github.com/skeeto/opengl-demo</a></li>
</ul>

<p>No 3D graphics, no matrix library, no textures. It’s just a spinning
red square.</p>

<p><img src="/img/screenshot/opengl-demo.png" alt="" /></p>

<p>It supports both Linux and Windows. The Windows’ build is static, so
it compiles to a single, easily distributable, standalone binary. With
some minor tweaking it would probably support the BSDs as well. For
simplicity’s sake, the shaders are baked right into the source as
strings, but if you’re extending the demo for your own use, you may
want to move them out into their own source files.</p>

<h3 id="why-opengl-33">Why OpenGL 3.3?</h3>

<p>I chose OpenGL 3.3 in particular for three reasons:</p>

<ul>
  <li>Core and compatibility profiles were introduced in OpenGL 3.2
(2009). Obviously anything that focuses on core profile is going to
be 3.2 and up.</li>
  <li>OpenGL 3.3 (2010) <a href="https://www.opengl.org/wiki/History_of_OpenGL#OpenGL_3.3_.282010.29">introduced version 3.30</a> of the shading
language. This was a big deal and there’s little reason not to take
advantage of it. I specifically wanted to use the new <code class="language-plaintext highlighter-rouge">layout</code>
keyword.</li>
  <li>Mesa 10.0 (2013) <a href="http://en.wikipedia.org/wiki/Mesa_%28computer_graphics%29#Implementations_of_rendering_APIs">supports up to OpenGL 3.3</a>. Mesa is the
prominent 3D graphics library for open source operating systems.
It’s what applications use for both hardware-accelerated and
software OpenGL rendering. This means the demo will work on any
modern Linux installation. (Note: when running on older hardware
without OpenGL 3.3 support, you may have to force software rendering
with the environment variable <code class="language-plaintext highlighter-rouge">LIBGL_ALWAYS_SOFTWARE=1</code>. The
software renderer will take advantage of your CPU’s SIMD features.)</li>
</ul>

<p>As far as “desktop” OpenGL goes, 3.3 is currently <em>the</em> prime target.</p>

<h3 id="why-glfw">Why GLFW?</h3>

<p>Until <a href="https://www.khronos.org/egl/">EGL</a> someday fills this role, the process for obtaining an
OpenGL context is specific to each operating system, where it’s
generally a pain in the butt. GLUT, the OpenGL Utility Toolkit, was a
library to make this process uniform across the different platforms.
It also normalized user input (keyboard and mouse) and provided some
basic (and outdated) utility functions.</p>

<p>The original GLUT isn’t quite open source (licensing issues) and it’s
no longer maintained. The open source replacement for GLUT is
<a href="http://freeglut.sourceforge.net/">FreeGLUT</a>. It’s what you’d typically find on a Linux
system in place of the original GLUT.</p>

<p>I just need a portable library that creates a window, handles keyboard
and mouse events in that window, and gives me an OpenGL 3.3 core
profile context. FreeGLUT does this well, but we can do better. One
problem is that it includes a whole bunch of legacy cruft from GLUT:
immediate mode rendering utilities, menus, spaceball support, lots of
global state, and only one OpenGL context per process.</p>

<p>One of the biggest problems is that <strong>FreeGLUT doesn’t have a swap
interval function</strong>. This is used to lock the application’s redraw
rate to the system’s screen refresh rate, preventing screen tearing
and excessive resource consumption. I originally used FreeGLUT for the
demo, and, as a workaround, had added my own macro work around this by
finding the system’s swap interval function, but it was a total hack.</p>

<p>The demo was initially written with FreeGLUT, but I switched over to
<a href="http://www.glfw.org/">GLFW</a> since it’s smaller, simpler, cleaner, and more modern.
GLFW also has portable joystick handling. With the plethora of modern
context+window creation libraries out there, it seems there’s not much
reason to use FreeGLUT anymore.</p>

<p><a href="https://www.libsdl.org/">SDL 2.0</a> would also be an excellent choice. It goes beyond GLFW
with threading, audio, networking, image loading, and timers:
basically all the stuff you’d need when writing a game.</p>

<p>I’m sure there are some other good alternatives, especially when
you’re not sticking to plain C, but these are the libraries I’m
familiar with at the time of this article.</p>

<h3 id="why-gl3w">Why gl3w?</h3>

<p>If you didn’t think the interface between OpenGL and the operating
system was messy enough, I have good news for you. Neither the
operating system nor the video card drivers are going to provide any
of the correct headers, nor will you have anything meaningful to link
against! For these, you’re on your own.</p>

<p>The OpenGL Extension Wrangler Library (GLEW) was invented solve this
problem. It dynamically loads the system’s OpenGL libraries and finds
all the relevant functions at run time. That way your application
avoids linking to anything too specific. At compile time, it provides
the headers defining all of the OpenGL functions.</p>

<p>Over the years, GLEW has become outdated, to this day having no
support for core profile. So instead I used a replacement called
<a href="https://github.com/skaslev/gl3w">gl3w</a>. It’s just like GLEW, but, as the name suggests, oriented
around core profile … exactly what I needed. Unlike GLEW, it is
generated directly from Kronos’ documentation by a script. In
practice, you drop the generated code directly into your project
(embedded) rather than rely on the system to provide it as a library.</p>

<p>A great (and probably better) alternative to gl3w is
<a href="https://bitbucket.org/alfonse/glloadgen/wiki/Home">glLoadgen</a>. It’s the same idea — an automatically
generated OpenGL loader — but allows for full customization of the
output, such as the inclusion of select OpenGL extensions.</p>

<h3 id="conclusion">Conclusion</h3>

<p>While I hope it serves an educational resources for others, I
primarily have it for my own record-keeping, pedagogical, and
reference purposes, born out of a weekend’s worth of research. It’s a
starting point for future projects, and it’s somewhere easy to start
when I want to experiment with an idea.</p>

<p>Plus, someday I want to write a sweet, standalone game with fancy
OpenGL graphics.</p>

]]>
    </content>
  </entry>


  <entry>
    <title>A GPU Approach to Particle Physics</title>
    <link rel="alternate" type="text/html" href="https://nullprogram.com/blog/2014/06/29/"/>
    <id>urn:uuid:2d2ab14c-18c6-3968-d9b1-5243e7d0b2f1</id>
    <updated>2014-06-29T03:23:42Z</updated>
    <category term="webgl"/><category term="media"/><category term="interactive"/><category term="gpgpu"/><category term="javascript"/><category term="opengl"/>
    <content type="html">
      <![CDATA[<p>The next project in my <a href="/tags/gpgpu/">GPGPU series</a> is a particle physics
engine that computes the entire physics simulation on the GPU.
Particles are influenced by gravity and will bounce off scene
geometry. This WebGL demo uses a shader feature not strictly required
by the OpenGL ES 2.0 specification, so it may not work on some
platforms, especially mobile devices. It will be discussed later in
the article.</p>

<ul>
  <li><a href="https://skeeto.github.io/webgl-particles/">https://skeeto.github.io/webgl-particles/</a> (<a href="https://github.com/skeeto/webgl-particles">source</a>)</li>
</ul>

<p>It’s interactive. The mouse cursor is a circular obstacle that the
particles bounce off of, and clicking will place a permanent obstacle
in the simulation. You can paint and draw structures through which the
the particles will flow.</p>

<p>Here’s an HTML5 video of the demo in action, which, out of necessity,
is recorded at 60 frames-per-second and a high bitrate, so it’s pretty
big. Video codecs don’t gracefully handle all these full-screen
particles very well and lower framerates really don’t capture the
effect properly. I also added some appropriate sound that you won’t
hear in the actual demo.</p>

<video width="500" height="375" controls="" poster="/img/particles/poster.png" preload="none">
  <source src="https://nullprogram.s3.amazonaws.com/particles/particles.webm" type="video/webm" />
  <source src="https://nullprogram.s3.amazonaws.com/particles/particles.mp4" type="video/mp4" />
  <img src="/img/particles/poster.png" width="500" height="375" />
</video>

<p>On a modern GPU, it can simulate <em>and</em> draw over 4 million particles
at 60 frames per second. Keep in mind that this is a JavaScript
application, I haven’t really spent time optimizing the shaders, and
it’s living within the constraints of WebGL rather than something more
suitable for general computation, like OpenCL or at least desktop
OpenGL.</p>

<h3 id="encoding-particle-state-as-color">Encoding Particle State as Color</h3>

<p>Just as with the <a href="/blog/2014/06/10/">Game of Life</a> and <a href="/blog/2014/06/22/">path finding</a>
projects, simulation state is stored in pairs of textures and the
majority of the work is done by a fragment shader mapped between them
pixel-to-pixel. I won’t repeat myself with the details of setting this
up, so refer to the Game of Life article if you need to see how it
works.</p>

<p>For this simulation, there are four of these textures instead of two:
a pair of position textures and a pair of velocity textures. Why pairs
of textures? There are 4 channels, so every one of these components
(x, y, dx, dy) could be packed into its own color channel. This seems
like the simplest solution.</p>

<p><img src="/img/particles/pack-tight.png" alt="" /></p>

<p>The problem with this scheme is the lack of precision. With the
R8G8B8A8 internal texture format, each channel is one byte. That’s 256
total possible values. The display area is 800 by 600 pixels, so not
even every position on the display would be possible. Fortunately, two
bytes, for a total of 65,536 values, is plenty for our purposes.</p>

<p><img src="/img/particles/position-pack.png" alt="" />
<img src="/img/particles/velocity-pack.png" alt="" /></p>

<p>The next problem is how to encode values across these two channels. It
needs to cover negative values (negative velocity) and it should try
to take full advantage of dynamic range, i.e. try to spread usage
across all of those 65,536 values.</p>

<p>To encode a value, multiply the value by a scalar to stretch it over
the encoding’s dynamic range. The scalar is selected so that the
required highest values (the dimensions of the display) are the
highest values of the encoding.</p>

<p>Next, add half the dynamic range to the scaled value. This converts
all negative values into positive values with 0 representing the
lowest value. This representation is called <a href="http://en.wikipedia.org/wiki/Signed_number_representations#Excess-K">Excess-K</a>. The
downside to this is that clearing the texture (<code class="language-plaintext highlighter-rouge">glClearColor</code>) with
transparent black no longer sets the decoded values to 0.</p>

<p>Finally, treat each channel as a digit of a base-256 number. The
OpenGL ES 2.0 shader language has no bitwise operators, so this is
done with plain old division and modulus. I made an encoder and
decoder in both JavaScript and GLSL. JavaScript needs it to write the
initial values and, for debugging purposes, so that it can read back
particle positions.</p>

<div class="language-glsl highlighter-rouge"><div class="highlight"><pre class="highlight"><code><span class="kt">vec2</span> <span class="nf">encode</span><span class="p">(</span><span class="kt">float</span> <span class="n">value</span><span class="p">)</span> <span class="p">{</span>
    <span class="n">value</span> <span class="o">=</span> <span class="n">value</span> <span class="o">*</span> <span class="n">scale</span> <span class="o">+</span> <span class="n">OFFSET</span><span class="p">;</span>
    <span class="kt">float</span> <span class="n">x</span> <span class="o">=</span> <span class="n">mod</span><span class="p">(</span><span class="n">value</span><span class="p">,</span> <span class="n">BASE</span><span class="p">);</span>
    <span class="kt">float</span> <span class="n">y</span> <span class="o">=</span> <span class="n">floor</span><span class="p">(</span><span class="n">value</span> <span class="o">/</span> <span class="n">BASE</span><span class="p">);</span>
    <span class="k">return</span> <span class="kt">vec2</span><span class="p">(</span><span class="n">x</span><span class="p">,</span> <span class="n">y</span><span class="p">)</span> <span class="o">/</span> <span class="n">BASE</span><span class="p">;</span>
<span class="p">}</span>

<span class="kt">float</span> <span class="nf">decode</span><span class="p">(</span><span class="kt">vec2</span> <span class="n">channels</span><span class="p">)</span> <span class="p">{</span>
    <span class="k">return</span> <span class="p">(</span><span class="n">dot</span><span class="p">(</span><span class="n">channels</span><span class="p">,</span> <span class="kt">vec2</span><span class="p">(</span><span class="n">BASE</span><span class="p">,</span> <span class="n">BASE</span> <span class="o">*</span> <span class="n">BASE</span><span class="p">))</span> <span class="o">-</span> <span class="n">OFFSET</span><span class="p">)</span> <span class="o">/</span> <span class="n">scale</span><span class="p">;</span>
<span class="p">}</span>
</code></pre></div></div>

<p>And JavaScript. Unlike normalized GLSL values above (0.0-1.0), this
produces one-byte integers (0-255) for packing into typed arrays.</p>

<div class="language-js highlighter-rouge"><div class="highlight"><pre class="highlight"><code><span class="kd">function</span> <span class="nx">encode</span><span class="p">(</span><span class="nx">value</span><span class="p">,</span> <span class="nx">scale</span><span class="p">)</span> <span class="p">{</span>
    <span class="kd">var</span> <span class="nx">b</span> <span class="o">=</span> <span class="nx">Particles</span><span class="p">.</span><span class="nx">BASE</span><span class="p">;</span>
    <span class="nx">value</span> <span class="o">=</span> <span class="nx">value</span> <span class="o">*</span> <span class="nx">scale</span> <span class="o">+</span> <span class="nx">b</span> <span class="o">*</span> <span class="nx">b</span> <span class="o">/</span> <span class="mi">2</span><span class="p">;</span>
    <span class="kd">var</span> <span class="nx">pair</span> <span class="o">=</span> <span class="p">[</span>
        <span class="nb">Math</span><span class="p">.</span><span class="nx">floor</span><span class="p">((</span><span class="nx">value</span> <span class="o">%</span> <span class="nx">b</span><span class="p">)</span> <span class="o">/</span> <span class="nx">b</span> <span class="o">*</span> <span class="mi">255</span><span class="p">),</span>
        <span class="nb">Math</span><span class="p">.</span><span class="nx">floor</span><span class="p">(</span><span class="nb">Math</span><span class="p">.</span><span class="nx">floor</span><span class="p">(</span><span class="nx">value</span> <span class="o">/</span> <span class="nx">b</span><span class="p">)</span> <span class="o">/</span> <span class="nx">b</span> <span class="o">*</span> <span class="mi">255</span><span class="p">)</span>
    <span class="p">];</span>
    <span class="k">return</span> <span class="nx">pair</span><span class="p">;</span>
<span class="p">}</span>

<span class="kd">function</span> <span class="nx">decode</span><span class="p">(</span><span class="nx">pair</span><span class="p">,</span> <span class="nx">scale</span><span class="p">)</span> <span class="p">{</span>
    <span class="kd">var</span> <span class="nx">b</span> <span class="o">=</span> <span class="nx">Particles</span><span class="p">.</span><span class="nx">BASE</span><span class="p">;</span>
    <span class="k">return</span> <span class="p">(((</span><span class="nx">pair</span><span class="p">[</span><span class="mi">0</span><span class="p">]</span> <span class="o">/</span> <span class="mi">255</span><span class="p">)</span> <span class="o">*</span> <span class="nx">b</span> <span class="o">+</span>
             <span class="p">(</span><span class="nx">pair</span><span class="p">[</span><span class="mi">1</span><span class="p">]</span> <span class="o">/</span> <span class="mi">255</span><span class="p">)</span> <span class="o">*</span> <span class="nx">b</span> <span class="o">*</span> <span class="nx">b</span><span class="p">)</span> <span class="o">-</span> <span class="nx">b</span> <span class="o">*</span> <span class="nx">b</span> <span class="o">/</span> <span class="mi">2</span><span class="p">)</span> <span class="o">/</span> <span class="nx">scale</span><span class="p">;</span>
<span class="p">}</span>
</code></pre></div></div>

<p>The fragment shader that updates each particle samples the position
and velocity textures at that particle’s “index”, decodes their
values, operates on them, then encodes them back into a color for
writing to the output texture. Since I’m using WebGL, which lacks
multiple rendering targets (despite having support for <code class="language-plaintext highlighter-rouge">gl_FragData</code>),
the fragment shader can only output one color. Position is updated in
one pass and velocity in another as two separate draws. The buffers
are not swapped until <em>after</em> both passes are done, so the velocity
shader (intentionally) doesn’t uses the updated position values.</p>

<p>There’s a limit to the maximum texture size, typically 8,192 or 4,096,
so rather than lay the particles out in a one-dimensional texture, the
texture is kept square. Particles are indexed by two-dimensional
coordinates.</p>

<p>It’s pretty interesting to see the position or velocity textures drawn
directly to the screen rather than the normal display. It’s another
domain through which to view the simulation, and it even helped me
identify some issues that were otherwise hard to see. The output is a
shimmering array of color, but with definite patterns, revealing a lot
about the entropy (or lack thereof) of the system. I’d share a video
of it, but it would be even more impractical to encode than the normal
display. Here are screenshots instead: position, then velocity. The
alpha component is not captured here.</p>

<p><img src="/img/particles/position.png" alt="" />
<img src="/img/particles/velocity.png" alt="" /></p>

<h3 id="entropy-conservation">Entropy Conservation</h3>

<p>One of the biggest challenges with running a simulation like this on a
GPU is the lack of random values. There’s no <code class="language-plaintext highlighter-rouge">rand()</code> function in the
shader language, so the whole thing is deterministic by default. All
entropy comes from the initial texture state filled by the CPU. When
particles clump up and match state, perhaps from flowing together over
an obstacle, it can be difficult to work them back apart since the
simulation handles them identically.</p>

<p>To mitigate this problem, the first rule is to conserve entropy
whenever possible. When a particle falls out of the bottom of the
display, it’s “reset” by moving it back to the top. If this is done by
setting the particle’s Y value to 0, then information is destroyed.
This must be avoided! Particles below the bottom edge of the display
tend to have slightly different Y values, despite exiting during the
same iteration. Instead of resetting to 0, a constant value is added:
the height of the display. The Y values remain different, so these
particles are more likely to follow different routes when bumping into
obstacles.</p>

<p>The next technique I used is to supply a single fresh random value via
a uniform for each iteration This value is added to the position and
velocity of reset particles. The same value is used for all particles
for that particular iteration, so this doesn’t help with overlapping
particles, but it does help to break apart “streams”. These are
clearly-visible lines of particles all following the same path. Each
exits the bottom of the display on a different iteration, so the
random value separates them slightly. Ultimately this stirs in a few
bits of fresh entropy into the simulation on each iteration.</p>

<p>Alternatively, a texture containing random values could be supplied to
the shader. The CPU would have to frequently fill and upload the
texture, plus there’s the issue of choosing where to sample the
texture, itself requiring a random value.</p>

<p>Finally, to deal with particles that have exactly overlapped, the
particle’s unique two-dimensional index is scaled and added to the
position and velocity when resetting, teasing them apart. The random
value’s sign is multiplied by the index to avoid bias in any
particular direction.</p>

<p>To see all this in action in the demo, make a big bowl to capture all
the particles, getting them to flow into a single point. This removes
all entropy from the system. Now clear the obstacles. They’ll all fall
down in a single, tight clump. It will still be somewhat clumped when
resetting at the top, but you’ll see them spraying apart a little bit
(particle indexes being added). These will exit the bottom at slightly
different times, so the random value plays its part to work them apart
even more. After a few rounds, the particles should be pretty evenly
spread again.</p>

<p>The last source of entropy is your mouse. When you move it through the
scene you disturb particles and introduce some noise to the
simulation.</p>

<h3 id="textures-as-vertex-attribute-buffers">Textures as Vertex Attribute Buffers</h3>

<p>This project idea occurred to me while reading the <a href="http://www.khronos.org/files/opengles_shading_language.pdf">OpenGL ES shader
language specification</a> (PDF). I’d been wanting to do a particle
system, but I was stuck on the problem how to draw the particles. The
texture data representing positions needs to somehow be fed back into
the pipeline as vertices. Normally a <a href="http://www.opengl.org/wiki/Buffer_Texture">buffer texture</a> — a texture
backed by an array buffer — or a <a href="http://www.opengl.org/wiki/Pixel_Buffer_Object">pixel buffer object</a> —
asynchronous texture data copying — might be used for this, but WebGL
has none these features. Pulling texture data off the GPU and putting
it all back on as an array buffer on each frame is out of the
question.</p>

<p>However, I came up with a cool technique that’s better than both those
anyway. The shader function <code class="language-plaintext highlighter-rouge">texture2D</code> is used to sample a pixel in a
texture. Normally this is used by the fragment shader as part of the
process of computing a color for a pixel. But the shader language
specification mentions that <code class="language-plaintext highlighter-rouge">texture2D</code> is available in vertex
shaders, too. That’s when it hit me. <strong>The vertex shader itself can
perform the conversion from texture to vertices.</strong></p>

<p>It works by passing the previously-mentioned two-dimensional particle
indexes as the vertex attributes, using them to look up particle
positions from within the vertex shader. The shader would run in
<code class="language-plaintext highlighter-rouge">GL_POINTS</code> mode, emitting point sprites. Here’s the abridged version,</p>

<div class="language-glsl highlighter-rouge"><div class="highlight"><pre class="highlight"><code><span class="k">attribute</span> <span class="kt">vec2</span> <span class="n">index</span><span class="p">;</span>

<span class="k">uniform</span> <span class="kt">sampler2D</span> <span class="n">positions</span><span class="p">;</span>
<span class="k">uniform</span> <span class="kt">vec2</span> <span class="n">statesize</span><span class="p">;</span>
<span class="k">uniform</span> <span class="kt">vec2</span> <span class="n">worldsize</span><span class="p">;</span>
<span class="k">uniform</span> <span class="kt">float</span> <span class="n">size</span><span class="p">;</span>

<span class="c1">// float decode(vec2) { ...</span>

<span class="kt">void</span> <span class="nf">main</span><span class="p">()</span> <span class="p">{</span>
    <span class="kt">vec4</span> <span class="n">psample</span> <span class="o">=</span> <span class="n">texture2D</span><span class="p">(</span><span class="n">positions</span><span class="p">,</span> <span class="n">index</span> <span class="o">/</span> <span class="n">statesize</span><span class="p">);</span>
    <span class="kt">vec2</span> <span class="n">p</span> <span class="o">=</span> <span class="kt">vec2</span><span class="p">(</span><span class="n">decode</span><span class="p">(</span><span class="n">psample</span><span class="p">.</span><span class="n">rg</span><span class="p">),</span> <span class="n">decode</span><span class="p">(</span><span class="n">psample</span><span class="p">.</span><span class="n">ba</span><span class="p">));</span>
    <span class="nb">gl_Position</span> <span class="o">=</span> <span class="kt">vec4</span><span class="p">(</span><span class="n">p</span> <span class="o">/</span> <span class="n">worldsize</span> <span class="o">*</span> <span class="mi">2</span><span class="p">.</span><span class="mi">0</span> <span class="o">-</span> <span class="mi">1</span><span class="p">.</span><span class="mi">0</span><span class="p">,</span> <span class="mi">0</span><span class="p">,</span> <span class="mi">1</span><span class="p">);</span>
    <span class="nb">gl_PointSize</span> <span class="o">=</span> <span class="n">size</span><span class="p">;</span>
<span class="p">}</span>
</code></pre></div></div>

<p>The real version also samples the velocity since it modulates the
color (slow moving particles are lighter than fast moving particles).</p>

<p>However, there’s a catch: implementations are allowed to limit the
number of vertex shader texture bindings to 0
(<code class="language-plaintext highlighter-rouge">GL_MAX_VERTEX_TEXTURE_IMAGE_UNITS</code>). So <em>technically</em> vertex shaders
must always support <code class="language-plaintext highlighter-rouge">texture2D</code>, but they’re not required to support
actually having textures. It’s sort of like food service on an
airplane that doesn’t carry passengers. These platforms don’t support
this technique. So far I’ve only had this problem on some mobile
devices.</p>

<p>Outside of the lack of support by some platforms, this allows every
part of the simulation to stay on the GPU and paves the way for a pure
GPU particle system.</p>

<h3 id="obstacles">Obstacles</h3>

<p>An important observation is that particles do not interact with each
other. This is not an n-body simulation. They do, however, interact
with the rest of the world: they bounce intuitively off those static
circles. This environment is represented by another texture, one
that’s not updated during normal iteration. I call this the <em>obstacle</em>
texture.</p>

<p>The colors on the obstacle texture are surface normals. That is, each
pixel has a direction to it, a flow directing particles in some
direction. Empty space has a special normal value of (0, 0). This is
not normalized (doesn’t have a length of 1), so it’s an out-of-band
value that has no effect on particles.</p>

<p><img src="/img/particles/obstacle.png" alt="" /></p>

<p>(I didn’t realize until I was done how much this looks like the
Greendale Community College flag.)</p>

<p>A particle checks for a collision simply by sampling the obstacle
texture. If it finds a normal at its location, it changes its velocity
using the shader function <code class="language-plaintext highlighter-rouge">reflect</code>. This function is normally used
for reflecting light in a 3D scene, but it works equally well for
slow-moving particles. The effect is that particles bounce off the the
circle in a natural way.</p>

<p>Sometimes particles end up on/in an obstacle with a low or zero
velocity. To dislodge these they’re given a little nudge in the
direction of the normal, pushing them away from the obstacle. You’ll
see this on slopes where slow particles jiggle their way down to
freedom like jumping beans.</p>

<p>To make the obstacle texture user-friendly, the actual geometry is
maintained on the CPU side of things in JavaScript. It keeps a list of
these circles and, on updates, redraws the obstacle texture from this
list. This happens, for example, every time you move your mouse on the
screen, providing a moving obstacle. The texture provides
shader-friendly access to the geometry. Two representations for two
purposes.</p>

<p>When I started writing this part of the program, I envisioned that
shapes other than circles could place placed, too. For example, solid
rectangles: the normals would look something like this.</p>

<p><img src="/img/particles/rectangle.png" alt="" /></p>

<p>So far these are unimplemented.</p>

<h4 id="future-ideas">Future Ideas</h4>

<p>I didn’t try it yet, but I wonder if particles could interact with
each other by also drawing themselves onto the obstacles texture. Two
nearby particles would bounce off each other. Perhaps <a href="/blog/2013/06/26/">the entire
liquid demo</a> could run on the GPU like this. If I’m imagining
it correctly, particles would gain volume and obstacles forming bowl
shapes would fill up rather than concentrate particles into a single
point.</p>

<p>I think there’s still some more to explore with this project.</p>

]]>
    </content>
  </entry>


  <entry>
    <title>A GPU Approach to Path Finding</title>
    <link rel="alternate" type="text/html" href="https://nullprogram.com/blog/2014/06/22/"/>
    <id>urn:uuid:29de5cb3-f93a-3e6e-9adc-ff689e736877</id>
    <updated>2014-06-22T22:51:46Z</updated>
    <category term="ai"/><category term="webgl"/><category term="javascript"/><category term="gpgpu"/><category term="opengl"/>
    <content type="html">
      <![CDATA[<p>Last time <a href="/blog/2014/06/10/">I demonstrated how to run Conway’s Game of Life</a>
entirely on a graphics card. This concept can be generalized to <em>any</em>
cellular automaton, including automata with more than two states. In
this article I’m going to exploit this to solve the <a href="http://en.wikipedia.org/wiki/Shortest_path_problem">shortest path
problem</a> for two-dimensional grids entirely on a GPU. It will be
just as fast as traditional searches on a CPU.</p>

<p>The JavaScript side of things is essentially the same as before — two
textures with fragment shader in between that steps the automaton
forward — so I won’t be repeating myself. The only parts that have
changed are the cell state encoding (to express all automaton states)
and the fragment shader (to code the new rules).</p>

<ul>
  <li><a href="https://skeeto.github.io/webgl-path-solver/">Online Demo</a>
(<a href="https://github.com/skeeto/webgl-path-solver">source</a>)</li>
</ul>

<p>Included is a pure JavaScript implementation of the cellular
automaton (State.js) that I used for debugging and experimentation,
but it doesn’t actually get used in the demo. A fragment shader
(12state.frag) encodes the full automaton rules for the GPU.</p>

<h3 id="maze-solving-cellular-automaton">Maze-solving Cellular Automaton</h3>

<p>There’s a dead simple 2-state cellular automaton that can solve any
<em>perfect</em> maze of arbitrary dimension. Each cell is either OPEN or a
WALL, only 4-connected neighbors are considered, and there’s only one
rule: if an OPEN cell has only one OPEN neighbor, it becomes a WALL.</p>

<p><img src="/img/path/simple.gif" alt="" /></p>

<p>On each step the dead ends collapse towards the solution. In the above
GIF, in order to keep the start and finish from collapsing, I’ve added
a third state (red) that holds them open. On a GPU, you’d have to do
as many draws as the length of the longest dead end.</p>

<p>A perfect maze is a maze where there is exactly one solution. This
technique doesn’t work for mazes with multiple solutions, loops, or
open spaces. The extra solutions won’t collapse into one, let alone
the shortest one.</p>

<p><img src="/img/path/simple-loop.gif" alt="" /></p>

<p>To fix this we need a more advanced cellular automaton.</p>

<h3 id="path-solving-cellular-automaton">Path-solving Cellular Automaton</h3>

<p>I came up with a 12-state cellular automaton that can not only solve
mazes, but will specifically find the shortest path. Like above, it
only considers 4-connected neighbors.</p>

<ul>
  <li>OPEN (white): passable space in the maze</li>
  <li>WALL (black): impassable space in the maze</li>
  <li>BEGIN (red): starting position</li>
  <li>END (red): goal position</li>
  <li>FLOW (green): flood fill that comes in four flavors: north, east, south, west</li>
  <li>ROUTE (blue): shortest path solution, also comes in four flavors</li>
</ul>

<p>If we wanted to consider 8-connected neighbors, everything would be
the same, but it would require 20 states (n, ne, e, se, s, sw, w, nw)
instead of 12. The rules are still pretty simple.</p>

<ul>
  <li>WALL and ROUTE cells never change state.</li>
  <li>OPEN becomes FLOW if it has any adjacent FLOW cells. It points
towards the neighboring FLOW cell (n, e, s, w).</li>
  <li>END becomes ROUTE if adjacent to a FLOW cell. It points towards the
FLOW cell (n, e, s, w). This rule is important for preventing
multiple solutions from appearing.</li>
  <li>FLOW becomes ROUTE if adjacent to a ROUTE cell that points towards
it. Combined with the above rule, it means when a FLOW cell touches
a ROUTE cell, there’s a cascade.</li>
  <li>BEGIN becomes ROUTE when adjacent to a ROUTE cell. The direction is
unimportant. This rule isn’t strictly necessary but will come in
handy later.</li>
</ul>

<p>This can be generalized for cellular grids of any arbitrary dimension,
and it could even run on a GPU for higher dimensions, limited
primarily by the number of texture uniform bindings (2D needs 1
texture binding, 3D needs 2 texture bindings, 4D needs 8 texture
bindings … I think). But if you need to find the shortest path along
a five-dimensional grid, I’d like to know why!</p>

<p>So what does it look like?</p>

<p><img src="/img/path/maze.gif" alt="" /></p>

<p>FLOW cells flood the entire maze. Branches of the maze are search in
parallel as they’re discovered. As soon as an END cell is touched, a
ROUTE is traced backwards along the flow to the BEGIN cell. It
requires double the number of steps as the length of the shortest
path.</p>

<p>Note that the FLOW cell keep flooding the maze even after the END was
found. It’s a cellular automaton, so there’s no way to communicate to
these other cells that the solution was discovered. However, when
running on a GPU this wouldn’t matter anyway. There’s no bailing out
early before all the fragment shaders have run.</p>

<p>What’s great about this is that we’re not limited to mazes whatsoever.
Here’s a path through a few connected rooms with open space.</p>

<p><img src="/img/path/flood.gif" alt="" /></p>

<h4 id="maze-types">Maze Types</h4>

<p>The worst-case solution is the longest possible shortest path. There’s
only one frontier and running the entire automaton to push it forward
by one cell is inefficient, even for a GPU.</p>

<p><img src="/img/path/spiral.gif" alt="" /></p>

<p>The way a maze is generated plays a large role in how quickly the
cellular automaton can solve it. A common maze generation algorithm
is a random depth-first search (DFS). The entire maze starts out
entirely walled in and the algorithm wanders around at random plowing
down walls, but never breaking into open space. When it comes to a
dead end, it unwinds looking for new walls to knock down. This methods
tends towards long, winding paths with a low branching factor.</p>

<p>The mazes you see in the demo are Kruskal’s algorithm mazes. Walls are
knocked out at random anywhere in the maze, without breaking the
perfect maze rule. It has a much higher branching factor and makes for
a much more interesting demo.</p>

<h4 id="skipping-the-route-step">Skipping the Route Step</h4>

<p>On my computers, with a 1023x1023 Kruskal maze <del>it’s about an
order of magnitude slower</del> (see update below) than <a href="http://en.wikipedia.org/wiki/A*_search_algorithm">A*</a>
(<a href="http://ondras.github.io/rot.js/hp/">rot.js’s version</a>) for the same maze. <del>Not very
impressive!</del> I <em>believe</em> this gap will close with time, as GPUs
become parallel faster than CPUs get faster. However, there’s
something important to consider: it’s not only solving the shortest
path between source and goal, <strong>it’s finding the shortest path between
the source and any other point</strong>. At its core it’s a <a href="http://www.redblobgames.com/pathfinding/tower-defense/">breadth-first
grid search</a>.</p>

<p><em>Update</em>: One day after writing this article I realized that
<code class="language-plaintext highlighter-rouge">glReadPixels</code> was causing a gigantic bottlebeck. By only checking for
the end conditions once every 500 iterations, this method is now
equally fast as A* on modern graphics cards, despite taking up to an
extra 499 iterations. <strong>In just a few more years, this technique
should be faster than A*.</strong></p>

<p>Really, there’s little use in ROUTE step. It’s a poor fit for the GPU.
It has no use in any real application. I’m using it here mainly for
demonstration purposes. If dropped, the cellular automaton would
become 6 states: OPEN, WALL, and four flavors of FLOW. Seed the source
point with a FLOW cell (arbitrary direction) and run the automaton
until all of the OPEN cells are gone.</p>

<h3 id="detecting-end-state">Detecting End State</h3>

<p>The ROUTE cells do have a useful purpose, though. How do we know when
we’re done? We can poll the BEGIN cell to check for when it becomes a
ROUTE cell. Then we know we’ve found the solution. This doesn’t
necessarily mean all of the FLOW cells have finished propagating,
though, especially in the case of a DFS-maze.</p>

<p>In a CPU-based solution, I’d keep a counter and increment it every
time an OPEN cell changes state. The the counter doesn’t change after
an iteration, I’m done. OpenGL 4.2 introduces an <a href="http://www.opengl.org/wiki/Atomic_Counter">atomic
counter</a> that could serve this role, but this isn’t available in
OpenGL ES / WebGL. The only thing left to do is use <code class="language-plaintext highlighter-rouge">glReadPixels</code> to
pull down the entire thing and check for end state on the CPU.</p>

<p>The original 2-state automaton above also suffers from this problem.</p>

<h3 id="encoding-cell-state">Encoding Cell State</h3>

<p>Cells are stored per pixel in a GPU texture. I spent quite some time
trying to brainstorm a clever way to encode the twelve cell states
into a vec4 color. Perhaps there’s some way to <a href="/blog/2014/06/21/">exploit
blending</a> to update cell states, or make use of some other kind
of built-in pixel math. I couldn’t think of anything better than a
straight-forward encoding of 0 to 11 into a single color channel (red
in my case).</p>

<div class="language-glsl highlighter-rouge"><div class="highlight"><pre class="highlight"><code><span class="kt">int</span> <span class="nf">state</span><span class="p">(</span><span class="kt">vec2</span> <span class="n">offset</span><span class="p">)</span> <span class="p">{</span>
    <span class="kt">vec2</span> <span class="n">coord</span> <span class="o">=</span> <span class="p">(</span><span class="nb">gl_FragCoord</span><span class="p">.</span><span class="n">xy</span> <span class="o">+</span> <span class="n">offset</span><span class="p">)</span> <span class="o">/</span> <span class="n">scale</span><span class="p">;</span>
    <span class="kt">vec4</span> <span class="n">color</span> <span class="o">=</span> <span class="n">texture2D</span><span class="p">(</span><span class="n">maze</span><span class="p">,</span> <span class="n">coord</span><span class="p">);</span>
    <span class="k">return</span> <span class="kt">int</span><span class="p">(</span><span class="n">color</span><span class="p">.</span><span class="n">r</span> <span class="o">*</span> <span class="mi">11</span><span class="p">.</span><span class="mi">0</span> <span class="o">+</span> <span class="mi">0</span><span class="p">.</span><span class="mi">5</span><span class="p">);</span>
<span class="p">}</span>
</code></pre></div></div>

<p>This leaves three untouched channels for other useful information. I
experimented (uncommitted) with writing distance in the green channel.
When an OPEN cell becomes a FLOW cell, it adds 1 to its adjacent FLOW
cell distance. I imagine this could be really useful in a real
application: put your map on the GPU, run the cellular automaton a
sufficient number of times, pull the map back off (<code class="language-plaintext highlighter-rouge">glReadPixels</code>),
and for every point you know both the path and total distance to the
source point.</p>

<h3 id="performance">Performance</h3>

<p>As mentioned above, I ran the GPU maze-solver against A* to test its
performance. I didn’t yet try running it against Dijkstra’s algorithm
on a CPU over the entire grid (one source, many destinations). If I
had to guess, I’d bet the GPU would come out on top for grids with a
high branching factor (open spaces, etc.) so that its parallelism is
most effectively exploited, but Dijkstra’s algorithm would win in all
other cases.</p>

<p>Overall this is more of a proof of concept than a practical
application. It’s proof that we can trick OpenGL into solving mazes
for us!</p>

]]>
    </content>
  </entry>


  <entry>
    <title>Feedback Applet Ported to WebGL</title>
    <link rel="alternate" type="text/html" href="https://nullprogram.com/blog/2014/06/21/"/>
    <id>urn:uuid:1bcbcaaa-35b8-34f8-b114-34a2116882ef</id>
    <updated>2014-06-21T02:49:57Z</updated>
    <category term="webgl"/><category term="javascript"/><category term="media"/><category term="interactive"/><category term="opengl"/>
    <content type="html">
      <![CDATA[<p>The biggest flaw with so many OpenGL tutorials is trying to teach two
complicated topics at once: the OpenGL API and 3D graphics. These are
only loosely related and do not need to be learned simultaneously.
It’s far more valuable to <a href="http://www.skorks.com/2010/04/on-the-value-of-fundamentals-in-software-development/">focus on the fundamentals</a>, which can
only happen when handled separately. With the programmable pipeline,
OpenGL is useful for a lot more than 3D graphics. There are many
non-3D directions that tutorials can take.</p>

<p>I think that’s why I’ve been enjoying my journey through WebGL so
much. Except for <a href="https://skeeto.github.io/sphere-js/">my sphere demo</a>, which was only barely 3D,
none of <a href="/toys/">my projects</a> have been what would typically be
considered 3D graphics. Instead, each new project has introduced me to
some new aspect of OpenGL, accidentally playing out like a great
tutorial. I started out drawing points and lines, then took a dive
<a href="https://skeeto.github.io/perlin-noise/">into non-trivial fragment shaders</a>, then <a href="/blog/2013/06/26/">textures and
framebuffers</a>, then the <a href="/blog/2014/06/01/">depth buffer</a>, then <a href="/blog/2014/06/10/">general
computation</a> with fragment shaders.</p>

<p>The next project introduced me to <em>alpha blending</em>. <strong>I ported <a href="/blog/2011/05/01/">my old
feedback applet</a> to WebGL!</strong></p>

<ul>
  <li><a href="https://skeeto.github.io/Feedback/webgl/">https://skeeto.github.io/Feedback/webgl/</a>
(<a href="http://github.com/skeeto/Feedback">source</a>)</li>
</ul>

<p>Since finishing the port I’ve already spent a couple of hours just
playing with it. It’s mesmerizing. Here’s a video demonstration in
case WebGL doesn’t work for you yet. I’m manually driving it to show
off the different things it can do.</p>

<video width="500" height="500" controls="">
  <source src="https://nullprogram.s3.amazonaws.com/feedback/feedback.webm" type="video/webm" />
  <source src="https://nullprogram.s3.amazonaws.com/feedback/feedback.mp4" type="video/mp4" />
  <img src="https://nullprogram.s3.amazonaws.com/feedback/feedback-poster.png" width="500" height="500" />
</video>

<h3 id="drawing-a-frame">Drawing a Frame</h3>

<p>On my laptop, the original Java version plods along at about 6 frames
per second. That’s because it does all of the compositing on the CPU.
Each frame it has to blend over 1.2 million color components. This is
exactly the sort of thing the GPU is built to do. The WebGL version
does the full 60 frames per second (i.e. requestAnimationFrame)
without breaking a sweat. The CPU only computes a couple of 3x3 affine
transformation matrices per frame: virtually nothing.</p>

<p>Similar to my <a href="/blog/2014/06/10/">WebGL Game of Life</a>, there’s texture stored on the
GPU that holds almost all the system state. It’s the same size as the
display. To draw the next frame, this texture is drawn to the display
directly, then transformed (rotated and scaled down slightly), and
drawn again to the display. This is the “feedback” part and it’s where
blending kicks in. It’s the core component of the whole project.</p>

<p>Next, some fresh shapes are drawn to the display (i.e. the circle for
the mouse cursor) and the entire thing is captured back onto the state
texture with <code class="language-plaintext highlighter-rouge">glCopyTexImage2D</code>, to be used for the next frame. It’s
important that <code class="language-plaintext highlighter-rouge">glCopyTexImage2D</code> is called before returning to the
JavaScript top-level (back to the event loop), because the screen data
will no longer be available at that point, even if it’s still visible
on the screen.</p>

<h4 id="alpha-blending">Alpha Blending</h4>

<p>They say a picture is worth a thousand words, and that’s literally
true with the <a href="http://www.andersriggelsen.dk/glblendfunc.php">Visual glBlendFunc + glBlendEquation Tool</a>. A
few minutes playing with that tool tells you pretty much everything
you need to know.</p>

<p>While you <em>could</em> potentially perform blending yourself in a fragment
shader with multiple draw calls, it’s much better (and faster) to
configure OpenGL to do it. There are two functions to set it up:
<code class="language-plaintext highlighter-rouge">glBlendFunc</code> and <code class="language-plaintext highlighter-rouge">glBlendEquation</code>. There are also “separate”
versions of all this for specifying color channels separately, but I
don’t need that for this project.</p>

<p>The enumeration passed to <code class="language-plaintext highlighter-rouge">glBlendFunc</code> decides how the colors are
combined. In WebGL our options are <code class="language-plaintext highlighter-rouge">GL_FUNC_ADD</code> (a + b),
<code class="language-plaintext highlighter-rouge">GL_FUNC_SUBTRACT</code> (a - b), <code class="language-plaintext highlighter-rouge">GL_FUNC_REVERSE_SUBTRACT</code> (b - a). In
regular OpenGL there’s also <code class="language-plaintext highlighter-rouge">GL_MIN</code> (min(a, b)) and <code class="language-plaintext highlighter-rouge">GL_MAX</code> (max(a,
b)).</p>

<p>The function <code class="language-plaintext highlighter-rouge">glBlendEquation</code> takes two enumerations, choosing how
the alpha channels are applied to the colors before the blend function
(above) is applied. The alpha channel could be ignored and the color
used directly (<code class="language-plaintext highlighter-rouge">GL_ONE</code>) or discarded (<code class="language-plaintext highlighter-rouge">GL_ZERO</code>). The alpha channel
could be multiplied directly (<code class="language-plaintext highlighter-rouge">GL_SRC_ALPHA</code>, <code class="language-plaintext highlighter-rouge">GL_DST_ALPHA</code>), or
inverted first (<code class="language-plaintext highlighter-rouge">GL_ONE_MINUS_SRC_ALPHA</code>). In WebGL there are 72
possible combinations.</p>

<div class="language-js highlighter-rouge"><div class="highlight"><pre class="highlight"><code><span class="nx">gl</span><span class="p">.</span><span class="nx">enable</span><span class="p">(</span><span class="nx">gl</span><span class="p">.</span><span class="nx">BLEND</span><span class="p">);</span>
<span class="nx">gl</span><span class="p">.</span><span class="nx">blendEquation</span><span class="p">(</span><span class="nx">gl</span><span class="p">.</span><span class="nx">FUNC_ADD</span><span class="p">);</span>
<span class="nx">gl</span><span class="p">.</span><span class="nx">blendFunc</span><span class="p">(</span><span class="nx">gl</span><span class="p">.</span><span class="nx">SRC_ALPHA</span><span class="p">,</span> <span class="nx">gl</span><span class="p">.</span><span class="nx">SRC_ALPHA</span><span class="p">);</span>
</code></pre></div></div>

<p>In this project I’m using <code class="language-plaintext highlighter-rouge">GL_FUNC_ADD</code> and <code class="language-plaintext highlighter-rouge">GL_SRC_ALPHA</code> for both
source and destination. The alpha value put out by the fragment shader
is the experimentally-determined, magical value of 0.62. A little
higher and the feedback tends to blend towards bright white really
fast. A little lower and it blends away to nothing really fast. It’s a
numerical instability that has the interesting side effect of making
the demo <strong>behave <em>slightly</em> differently depending on the floating
point precision of the GPU running it</strong>!</p>

<h3 id="saving-a-screenshot">Saving a Screenshot</h3>

<p>The HTML5 canvas object that provides the WebGL context has a
<code class="language-plaintext highlighter-rouge">toDataURL()</code> method for grabbing the canvas contents as a friendly
base64-encoded PNG image. Unfortunately this doesn’t work with WebGL
unless the <code class="language-plaintext highlighter-rouge">preserveDrawingBuffer</code> options is set, which can introduce
performance issues. Without this option, the browser is free to throw
away the drawing buffer before the next JavaScript turn, making the
pixel information inaccessible.</p>

<p>By coincidence there’s a really convenient workaround for this
project. Remember that state texture? That’s exactly what we want to
save. I can attach it to a framebuffer and use <code class="language-plaintext highlighter-rouge">glReadPixels</code> just
like did in WebGL Game of Life to grab the simulation state. The pixel
data is then drawn to a background canvas (<em>without</em> using WebGL) and
<code class="language-plaintext highlighter-rouge">toDataURL()</code> is used on that canvas to get a PNG image. I slap this
on a link with <a href="https://developer.mozilla.org/en-US/docs/Web/HTML/Element/a#attr-download">the new download attribute</a> and call it done.</p>

<h3 id="anti-aliasing">Anti-aliasing</h3>

<p>At the time of this writing, support for automatic anti-aliasing in
WebGL is sparse at best. I’ve never seen it working anywhere yet, in
any browser on any platform. <code class="language-plaintext highlighter-rouge">GL_SMOOTH</code> isn’t available and the
anti-aliasing context creation option doesn’t do anything on any of my
computers. Fortunately I was able to work around this <a href="http://rubendv.be/graphics/opengl/2014/03/25/drawing-antialiased-circles-in-opengl.html">using a cool
<code class="language-plaintext highlighter-rouge">smoothstep</code> trick</a>.</p>

<p>The article I linked explains it better than I could, but here’s the
gist of it. This shader draws a circle in a quad, but leads to jagged,
sharp edges.</p>

<div class="language-glsl highlighter-rouge"><div class="highlight"><pre class="highlight"><code><span class="k">uniform</span> <span class="kt">vec4</span> <span class="n">color</span><span class="p">;</span>
<span class="k">varying</span> <span class="kt">vec3</span> <span class="n">coord</span><span class="p">;</span>  <span class="c1">// object space</span>

<span class="kt">void</span> <span class="nf">main</span><span class="p">()</span> <span class="p">{</span>
    <span class="k">if</span> <span class="p">(</span><span class="n">distance</span><span class="p">(</span><span class="n">coord</span><span class="p">.</span><span class="n">xy</span><span class="p">,</span> <span class="kt">vec2</span><span class="p">(</span><span class="mi">0</span><span class="p">,</span> <span class="mi">0</span><span class="p">))</span> <span class="o">&lt;</span> <span class="mi">1</span><span class="p">.</span><span class="mi">0</span><span class="p">)</span> <span class="p">{</span>
        <span class="nb">gl_FragColor</span> <span class="o">=</span> <span class="n">color</span><span class="p">;</span>
    <span class="p">}</span> <span class="k">else</span> <span class="p">{</span>
        <span class="nb">gl_FragColor</span> <span class="o">=</span> <span class="kt">vec4</span><span class="p">(</span><span class="mi">0</span><span class="p">,</span> <span class="mi">0</span><span class="p">,</span> <span class="mi">0</span><span class="p">,</span> <span class="mi">1</span><span class="p">);</span>
    <span class="p">}</span>
<span class="p">}</span>
</code></pre></div></div>

<p><img src="/img/feedback/hard.png" alt="" /></p>

<p>The improved version uses <code class="language-plaintext highlighter-rouge">smoothstep</code> to fade from inside the circle
to outside the circle. Not only does it look nicer on the screen, I
think it looks nicer as code, too. Unfortunately WebGL has no <code class="language-plaintext highlighter-rouge">fwidth</code>
function as explained in the article, so the delta is hardcoded.</p>

<div class="language-glsl highlighter-rouge"><div class="highlight"><pre class="highlight"><code><span class="k">uniform</span> <span class="kt">vec4</span> <span class="n">color</span><span class="p">;</span>
<span class="k">varying</span> <span class="kt">vec3</span> <span class="n">coord</span><span class="p">;</span>

<span class="k">const</span> <span class="kt">vec4</span> <span class="n">outside</span> <span class="o">=</span> <span class="kt">vec4</span><span class="p">(</span><span class="mi">0</span><span class="p">,</span> <span class="mi">0</span><span class="p">,</span> <span class="mi">0</span><span class="p">,</span> <span class="mi">1</span><span class="p">);</span>
<span class="k">const</span> <span class="kt">float</span> <span class="n">delta</span> <span class="o">=</span> <span class="mi">0</span><span class="p">.</span><span class="mi">1</span><span class="p">;</span>

<span class="kt">void</span> <span class="nf">main</span><span class="p">()</span> <span class="p">{</span>
    <span class="kt">float</span> <span class="n">dist</span> <span class="o">=</span> <span class="n">distance</span><span class="p">(</span><span class="n">coord</span><span class="p">.</span><span class="n">xy</span><span class="p">,</span> <span class="kt">vec2</span><span class="p">(</span><span class="mi">0</span><span class="p">,</span> <span class="mi">0</span><span class="p">));</span>
    <span class="kt">float</span> <span class="n">a</span> <span class="o">=</span> <span class="n">smoothstep</span><span class="p">(</span><span class="mi">1</span><span class="p">.</span><span class="mi">0</span> <span class="o">-</span> <span class="n">delta</span><span class="p">,</span> <span class="mi">1</span><span class="p">.</span><span class="mi">0</span><span class="p">,</span> <span class="n">dist</span><span class="p">);</span>
    <span class="nb">gl_FragColor</span> <span class="o">=</span> <span class="n">mix</span><span class="p">(</span><span class="n">color</span><span class="p">,</span> <span class="n">outside</span><span class="p">,</span> <span class="n">a</span><span class="p">);</span>
<span class="p">}</span>
</code></pre></div></div>

<p><img src="/img/feedback/smooth.png" alt="" /></p>

<h3 id="matrix-uniforms">Matrix Uniforms</h3>

<p>Up until this point I had avoided matrix uniforms. I was doing
transformations individually within the shader. However, as transforms
get more complicated, it’s much better to express the transform as a
matrix and let the shader language handle matrix multiplication
implicitly. Rather than pass half a dozen uniforms describing the
transform, you pass a single matrix that has the full range of motion.</p>

<p>My <a href="https://github.com/skeeto/igloojs">Igloo WebGL library</a> originally had a vector library that
provided GLSL-style vectors, including full swizzling. My long term
goal was to extend this to support GLSL-style matrices. However,
writing a matrix library from scratch was turning out to be <em>far</em> more
work than I expected. Plus it’s reinventing the wheel.</p>

<p>So, instead, I dropped my vector library — I completely deleted it —
and decided to use <a href="http://glmatrix.net/">glMatrix</a>, a <em>really</em> solid
WebGL-friendly matrix library. Highly recommended! It doesn’t
introduce any new types, it just provides functions for operating on
JavaScript typed arrays, the same arrays that get passed directly to
WebGL functions. This composes perfectly with Igloo without making it
a formal dependency.</p>

<p>Here’s my function for creating the mat3 uniform that transforms both
the main texture as well as the individual shape sprites. This use of
glMatrix looks a lot like <a href="http://docs.oracle.com/javase/7/docs/api/java/awt/geom/AffineTransform.html">java.awt.geom.AffineTransform</a>, does it
not? That’s one of my favorite parts of Java 2D, and <a href="/blog/2013/06/16/">I’ve been
missing it</a>.</p>

<div class="language-js highlighter-rouge"><div class="highlight"><pre class="highlight"><code><span class="cm">/* Translate, scale, and rotate. */</span>
<span class="nx">Feedback</span><span class="p">.</span><span class="nx">affine</span> <span class="o">=</span> <span class="kd">function</span><span class="p">(</span><span class="nx">tx</span><span class="p">,</span> <span class="nx">ty</span><span class="p">,</span> <span class="nx">sx</span><span class="p">,</span> <span class="nx">sy</span><span class="p">,</span> <span class="nx">a</span><span class="p">)</span> <span class="p">{</span>
    <span class="kd">var</span> <span class="nx">m</span> <span class="o">=</span> <span class="nx">mat3</span><span class="p">.</span><span class="nx">create</span><span class="p">();</span>
    <span class="nx">mat3</span><span class="p">.</span><span class="nx">translate</span><span class="p">(</span><span class="nx">m</span><span class="p">,</span> <span class="nx">m</span><span class="p">,</span> <span class="p">[</span><span class="nx">tx</span><span class="p">,</span> <span class="nx">ty</span><span class="p">]);</span>
    <span class="nx">mat3</span><span class="p">.</span><span class="nx">rotate</span><span class="p">(</span><span class="nx">m</span><span class="p">,</span> <span class="nx">m</span><span class="p">,</span> <span class="nx">a</span><span class="p">);</span>
    <span class="nx">mat3</span><span class="p">.</span><span class="nx">scale</span><span class="p">(</span><span class="nx">m</span><span class="p">,</span> <span class="nx">m</span><span class="p">,</span> <span class="p">[</span><span class="nx">sx</span><span class="p">,</span> <span class="nx">sy</span><span class="p">]);</span>
    <span class="k">return</span> <span class="nx">m</span><span class="p">;</span>
<span class="p">};</span>
</code></pre></div></div>

<p>The return value is just a plain Float32Array that I can pass to
<code class="language-plaintext highlighter-rouge">glUniformMatrix3fv</code>. It becomes the <code class="language-plaintext highlighter-rouge">placement</code> uniform in the
shader.</p>

<div class="language-glsl highlighter-rouge"><div class="highlight"><pre class="highlight"><code><span class="k">attribute</span> <span class="kt">vec2</span> <span class="n">quad</span><span class="p">;</span>
<span class="k">uniform</span> <span class="kt">mat3</span> <span class="n">placement</span><span class="p">;</span>
<span class="k">varying</span> <span class="kt">vec3</span> <span class="n">coord</span><span class="p">;</span>

<span class="kt">void</span> <span class="nf">main</span><span class="p">()</span> <span class="p">{</span>
    <span class="n">coord</span> <span class="o">=</span> <span class="kt">vec3</span><span class="p">(</span><span class="n">quad</span><span class="p">,</span> <span class="mi">0</span><span class="p">);</span>
    <span class="kt">vec2</span> <span class="n">position</span> <span class="o">=</span> <span class="p">(</span><span class="n">placement</span> <span class="o">*</span> <span class="kt">vec3</span><span class="p">(</span><span class="n">quad</span><span class="p">,</span> <span class="mi">1</span><span class="p">)).</span><span class="n">xy</span><span class="p">;</span>
    <span class="nb">gl_Position</span> <span class="o">=</span> <span class="kt">vec4</span><span class="p">(</span><span class="n">position</span><span class="p">,</span> <span class="mi">0</span><span class="p">,</span> <span class="mi">1</span><span class="p">);</span>
<span class="p">}</span>
</code></pre></div></div>

<p>To move to 3D graphics from here, I would just need to step up to a
mat4 and operate on 3D coordinates instead of 2D. glMatrix would still
do the heavy lifting on the CPU side. If this was part of an OpenGL
tutorial series, perhaps that’s how it would transition to the next
stage.</p>

<h3 id="conclusion">Conclusion</h3>

<p>I’m really happy with how this one turned out. The only way it’s
indistinguishable from the original applet is that it runs faster. In
preparation for this project, I made a big pile of improvements to
Igloo, bringing it up to speed with my current WebGL knowledge. This
will greatly increase the speed at which I can code up and experiment
with future projects. WebGL + <a href="/blog/2012/10/31/">Skewer</a> + Igloo has really
become a powerful platform for rapid prototyping with OpenGL.</p>

]]>
    </content>
  </entry>


  <entry>
    <title>A GPU Approach to Conway's Game of Life</title>
    <link rel="alternate" type="text/html" href="https://nullprogram.com/blog/2014/06/10/"/>
    <id>urn:uuid:205b43ce-faa8-33c8-db27-173ddad64229</id>
    <updated>2014-06-10T06:29:48Z</updated>
    <category term="webgl"/><category term="javascript"/><category term="interactive"/><category term="gpgpu"/><category term="opengl"/>
    <content type="html">
      <![CDATA[<p class="abstract">
Update: In the next article, I <a href="/blog/2014/06/22/">extend this
program to solving mazes</a>. The demo has also been <a href="http://rykap.com/graphics/skew/2016/01/23/game-of-life.html">
ported to the Skew programming language</a>.
</p>

<p><a href="http://en.wikipedia.org/wiki/Conway%27s_Game_of_Life">Conway’s Game of Life</a> is <a href="/blog/2014/06/01/">another well-matched
workload</a> for GPUs. Here’s the actual WebGL demo if you want
to check it out before continuing.</p>

<ul>
  <li><a href="http://skeeto.github.io/webgl-game-of-life/">https://skeeto.github.io/webgl-game-of-life/</a>
(<a href="http://github.com/skeeto/webgl-game-of-life/">source</a>)</li>
</ul>

<p>To quickly summarize the rules:</p>

<ul>
  <li>The universe is a two-dimensional grid of 8-connected square cells.</li>
  <li>A cell is either dead or alive.</li>
  <li>A dead cell with exactly three living neighbors comes to life.</li>
  <li>A live cell with less than two neighbors dies from underpopulation.</li>
  <li>A live cell with more than three neighbors dies from overpopulation.</li>
</ul>

<p><img src="/img/gol/gol.gif" alt="" /></p>

<p>These simple cellular automata rules lead to surprisingly complex,
organic patterns. Cells are updated in parallel, so it’s generally
implemented using two separate buffers. This makes it a perfect
candidate for an OpenGL fragment shader.</p>

<h3 id="preparing-the-textures">Preparing the Textures</h3>

<p>The entire simulation state will be stored in a single, 2D texture in
GPU memory. Each pixel of the texture represents one Life cell. The
texture will have the internal format GL_RGBA. That is, each pixel
will have a red, green, blue, and alpha channel. This texture is not
drawn directly to the screen, so how exactly these channels are used
is mostly unimportant. It’s merely a simulation data structure. This
is because I’m using <a href="/blog/2013/06/10/">the OpenGL programmable pipeline for general
computation</a>. I’m calling this the “front” texture.</p>

<p>Four multi-bit (actual width is up to the GPU) channels seems
excessive considering that all I <em>really</em> need is a single bit of
state for each cell. However, due to <a href="http://www.opengl.org/wiki/Framebuffer_Object#Framebuffer_Completeness">framebuffer completion
rules</a>, in order to draw onto this texture it <em>must</em> be GL_RGBA.
I could pack more than one cell into one texture pixel, but this would
reduce parallelism: the shader will run once per pixel, not once per
cell.</p>

<p>Because cells are updated in parallel, this texture can’t be modified
in-place. It would overwrite important state. In order to do any real
work I need a second texture to store the update. This is the “back”
texture. After the update, this back texture will hold the current
simulation state, so the names of the front and back texture are
swapped. The front texture always holds the current state, with the
back texture acting as a workspace.</p>

<div class="language-javascript highlighter-rouge"><div class="highlight"><pre class="highlight"><code><span class="nx">GOL</span><span class="p">.</span><span class="nx">prototype</span><span class="p">.</span><span class="nx">swap</span> <span class="o">=</span> <span class="kd">function</span><span class="p">()</span> <span class="p">{</span>
    <span class="kd">var</span> <span class="nx">tmp</span> <span class="o">=</span> <span class="k">this</span><span class="p">.</span><span class="nx">textures</span><span class="p">.</span><span class="nx">front</span><span class="p">;</span>
    <span class="k">this</span><span class="p">.</span><span class="nx">textures</span><span class="p">.</span><span class="nx">front</span> <span class="o">=</span> <span class="k">this</span><span class="p">.</span><span class="nx">textures</span><span class="p">.</span><span class="nx">back</span><span class="p">;</span>
    <span class="k">this</span><span class="p">.</span><span class="nx">textures</span><span class="p">.</span><span class="nx">back</span> <span class="o">=</span> <span class="nx">tmp</span><span class="p">;</span>
    <span class="k">return</span> <span class="k">this</span><span class="p">;</span>
<span class="p">};</span>
</code></pre></div></div>

<p>Here’s how a texture is created and prepared. It’s wrapped in a
function/method because I’ll need two identical textures, making two
separate calls to this function. All of these settings are required
for framebuffer completion (explained later).</p>

<div class="language-javascript highlighter-rouge"><div class="highlight"><pre class="highlight"><code><span class="nx">GOL</span><span class="p">.</span><span class="nx">prototype</span><span class="p">.</span><span class="nx">texture</span> <span class="o">=</span> <span class="kd">function</span><span class="p">()</span> <span class="p">{</span>
    <span class="kd">var</span> <span class="nx">gl</span> <span class="o">=</span> <span class="k">this</span><span class="p">.</span><span class="nx">gl</span><span class="p">;</span>
    <span class="kd">var</span> <span class="nx">tex</span> <span class="o">=</span> <span class="nx">gl</span><span class="p">.</span><span class="nx">createTexture</span><span class="p">();</span>
    <span class="nx">gl</span><span class="p">.</span><span class="nx">bindTexture</span><span class="p">(</span><span class="nx">gl</span><span class="p">.</span><span class="nx">TEXTURE_2D</span><span class="p">,</span> <span class="nx">tex</span><span class="p">);</span>
    <span class="nx">gl</span><span class="p">.</span><span class="nx">texParameteri</span><span class="p">(</span><span class="nx">gl</span><span class="p">.</span><span class="nx">TEXTURE_2D</span><span class="p">,</span> <span class="nx">gl</span><span class="p">.</span><span class="nx">TEXTURE_WRAP_S</span><span class="p">,</span> <span class="nx">gl</span><span class="p">.</span><span class="nx">REPEAT</span><span class="p">);</span>
    <span class="nx">gl</span><span class="p">.</span><span class="nx">texParameteri</span><span class="p">(</span><span class="nx">gl</span><span class="p">.</span><span class="nx">TEXTURE_2D</span><span class="p">,</span> <span class="nx">gl</span><span class="p">.</span><span class="nx">TEXTURE_WRAP_T</span><span class="p">,</span> <span class="nx">gl</span><span class="p">.</span><span class="nx">REPEAT</span><span class="p">);</span>
    <span class="nx">gl</span><span class="p">.</span><span class="nx">texParameteri</span><span class="p">(</span><span class="nx">gl</span><span class="p">.</span><span class="nx">TEXTURE_2D</span><span class="p">,</span> <span class="nx">gl</span><span class="p">.</span><span class="nx">TEXTURE_MIN_FILTER</span><span class="p">,</span> <span class="nx">gl</span><span class="p">.</span><span class="nx">NEAREST</span><span class="p">);</span>
    <span class="nx">gl</span><span class="p">.</span><span class="nx">texParameteri</span><span class="p">(</span><span class="nx">gl</span><span class="p">.</span><span class="nx">TEXTURE_2D</span><span class="p">,</span> <span class="nx">gl</span><span class="p">.</span><span class="nx">TEXTURE_MAG_FILTER</span><span class="p">,</span> <span class="nx">gl</span><span class="p">.</span><span class="nx">NEAREST</span><span class="p">);</span>
    <span class="nx">gl</span><span class="p">.</span><span class="nx">texImage2D</span><span class="p">(</span><span class="nx">gl</span><span class="p">.</span><span class="nx">TEXTURE_2D</span><span class="p">,</span> <span class="mi">0</span><span class="p">,</span> <span class="nx">gl</span><span class="p">.</span><span class="nx">RGBA</span><span class="p">,</span>
                  <span class="k">this</span><span class="p">.</span><span class="nx">statesize</span><span class="p">.</span><span class="nx">x</span><span class="p">,</span> <span class="k">this</span><span class="p">.</span><span class="nx">statesize</span><span class="p">.</span><span class="nx">y</span><span class="p">,</span>
                  <span class="mi">0</span><span class="p">,</span> <span class="nx">gl</span><span class="p">.</span><span class="nx">RGBA</span><span class="p">,</span> <span class="nx">gl</span><span class="p">.</span><span class="nx">UNSIGNED_BYTE</span><span class="p">,</span> <span class="kc">null</span><span class="p">);</span>
    <span class="k">return</span> <span class="nx">tex</span><span class="p">;</span>
<span class="p">};</span>
</code></pre></div></div>

<p>A texture wrap of <code class="language-plaintext highlighter-rouge">GL_REPEAT</code> means the simulation will be
automatically <a href="http://en.wikipedia.org/wiki/Wraparound_(video_games)">torus-shaped</a>. The interpolation is
<code class="language-plaintext highlighter-rouge">GL_NEAREST</code>, because I don’t want to interpolate between cell states
at all. The final OpenGL call initializes the texture size
(<code class="language-plaintext highlighter-rouge">this.statesize</code>). This size is different than the size of the
display because, again, this is <em>actually</em> a simulation data structure
for my purposes.</p>

<p>The <code class="language-plaintext highlighter-rouge">null</code> at the end would normally be texture data. I don’t need to
supply any data at this point, so this is left blank. Normally this
would leave the texture content in an undefined state, but for
security purposes, WebGL will automatically ensure that it’s zeroed.
Otherwise there’s a chance that sensitive data might leak from another
WebGL instance on another page or, worse, from another process using
OpenGL. I’ll make a similar call again later with <code class="language-plaintext highlighter-rouge">glTexSubImage2D()</code>
to fill the texture with initial random state.</p>

<p>In OpenGL ES, and therefore WebGL, wrapped (<code class="language-plaintext highlighter-rouge">GL_REPEAT</code>) texture
dimensions must be powers of two, i.e. 512x512, 256x1024, etc. Since I
want to exploit the built-in texture wrapping, I’ve decided to
constrain my simulation state size to powers of two. If I manually did
the wrapping in the fragment shader, I could make the simulation state
any size I wanted.</p>

<h3 id="framebuffers">Framebuffers</h3>

<p>A framebuffer is the target of the current <code class="language-plaintext highlighter-rouge">glClear()</code>,
<code class="language-plaintext highlighter-rouge">glDrawArrays()</code>, or <code class="language-plaintext highlighter-rouge">glDrawElements()</code>. The user’s display is the
<em>default</em> framebuffer. New framebuffers can be created and used as
drawing targets in place of the default framebuffer. This is how
things are drawn off-screen without effecting the display.</p>

<p>A framebuffer by itself is nothing but an empty frame. It needs a
canvas. Other resources are attached in order to make use of it. For
the simulation I want to draw onto the back buffer, so I attach this
to a framebuffer. If this framebuffer is bound at the time of the draw
call, the output goes onto the texture. This is really powerful
because <strong>this texture can be used as an input for another draw
command</strong>, which is exactly what I’ll be doing later.</p>

<p>Here’s what making a single step of the simulation looks like.</p>

<div class="language-javascript highlighter-rouge"><div class="highlight"><pre class="highlight"><code><span class="nx">GOL</span><span class="p">.</span><span class="nx">prototype</span><span class="p">.</span><span class="nx">step</span> <span class="o">=</span> <span class="kd">function</span><span class="p">()</span> <span class="p">{</span>
    <span class="kd">var</span> <span class="nx">gl</span> <span class="o">=</span> <span class="k">this</span><span class="p">.</span><span class="nx">gl</span><span class="p">;</span>
    <span class="nx">gl</span><span class="p">.</span><span class="nx">bindFramebuffer</span><span class="p">(</span><span class="nx">gl</span><span class="p">.</span><span class="nx">FRAMEBUFFER</span><span class="p">,</span> <span class="k">this</span><span class="p">.</span><span class="nx">framebuffers</span><span class="p">.</span><span class="nx">step</span><span class="p">);</span>
    <span class="nx">gl</span><span class="p">.</span><span class="nx">framebufferTexture2D</span><span class="p">(</span><span class="nx">gl</span><span class="p">.</span><span class="nx">FRAMEBUFFER</span><span class="p">,</span> <span class="nx">gl</span><span class="p">.</span><span class="nx">COLOR_ATTACHMENT0</span><span class="p">,</span>
                            <span class="nx">gl</span><span class="p">.</span><span class="nx">TEXTURE_2D</span><span class="p">,</span> <span class="k">this</span><span class="p">.</span><span class="nx">textures</span><span class="p">.</span><span class="nx">back</span><span class="p">,</span> <span class="mi">0</span><span class="p">);</span>
    <span class="nx">gl</span><span class="p">.</span><span class="nx">viewport</span><span class="p">(</span><span class="mi">0</span><span class="p">,</span> <span class="mi">0</span><span class="p">,</span> <span class="k">this</span><span class="p">.</span><span class="nx">statesize</span><span class="p">.</span><span class="nx">x</span><span class="p">,</span> <span class="k">this</span><span class="p">.</span><span class="nx">statesize</span><span class="p">.</span><span class="nx">y</span><span class="p">);</span>
    <span class="nx">gl</span><span class="p">.</span><span class="nx">bindTexture</span><span class="p">(</span><span class="nx">gl</span><span class="p">.</span><span class="nx">TEXTURE_2D</span><span class="p">,</span> <span class="k">this</span><span class="p">.</span><span class="nx">textures</span><span class="p">.</span><span class="nx">front</span><span class="p">);</span>
    <span class="k">this</span><span class="p">.</span><span class="nx">programs</span><span class="p">.</span><span class="nx">gol</span><span class="p">.</span><span class="nx">use</span><span class="p">()</span>
        <span class="p">.</span><span class="nx">attrib</span><span class="p">(</span><span class="dl">'</span><span class="s1">quad</span><span class="dl">'</span><span class="p">,</span> <span class="k">this</span><span class="p">.</span><span class="nx">buffers</span><span class="p">.</span><span class="nx">quad</span><span class="p">,</span> <span class="mi">2</span><span class="p">)</span>
        <span class="p">.</span><span class="nx">uniform</span><span class="p">(</span><span class="dl">'</span><span class="s1">state</span><span class="dl">'</span><span class="p">,</span> <span class="mi">0</span><span class="p">,</span> <span class="kc">true</span><span class="p">)</span>
        <span class="p">.</span><span class="nx">uniform</span><span class="p">(</span><span class="dl">'</span><span class="s1">scale</span><span class="dl">'</span><span class="p">,</span> <span class="k">this</span><span class="p">.</span><span class="nx">statesize</span><span class="p">)</span>
        <span class="p">.</span><span class="nx">draw</span><span class="p">(</span><span class="nx">gl</span><span class="p">.</span><span class="nx">TRIANGLE_STRIP</span><span class="p">,</span> <span class="mi">4</span><span class="p">);</span>
    <span class="k">this</span><span class="p">.</span><span class="nx">swap</span><span class="p">();</span>
    <span class="k">return</span> <span class="k">this</span><span class="p">;</span>
<span class="p">};</span>
</code></pre></div></div>

<p>First, bind the custom framebuffer as the current framebuffer with
<code class="language-plaintext highlighter-rouge">glBindFramebuffer()</code>. This framebuffer was previously created with
<code class="language-plaintext highlighter-rouge">glCreateFramebuffer()</code> and required no initial configuration. The
configuration is entirely done here, where the back texture is
attached to the current framebuffer. This replaces any texture that
might currently be attached to this spot — like the front texture
from the previous iteration. Finally, the size of the drawing area is
locked to the size of the simulation state with <code class="language-plaintext highlighter-rouge">glViewport()</code>.</p>

<p><a href="https://github.com/skeeto/igloojs">Using Igloo again</a> to keep the call concise, a fullscreen quad
is rendered so that the fragment shader runs <em>exactly</em> once for each
cell. That <code class="language-plaintext highlighter-rouge">state</code> uniform is the front texture, bound as
<code class="language-plaintext highlighter-rouge">GL_TEXTURE0</code>.</p>

<p>With the drawing complete, the buffers are swapped. Since every pixel
was drawn, there’s no need to ever use <code class="language-plaintext highlighter-rouge">glClear()</code>.</p>

<h3 id="the-game-of-life-fragment-shader">The Game of Life Fragment Shader</h3>

<p>The simulation rules are coded entirely in the fragment shader. After
initialization, JavaScript’s only job is to make the appropriate
<code class="language-plaintext highlighter-rouge">glDrawArrays()</code> call over and over. To run different cellular automata,
all I would need to do is modify the fragment shader and generate an
appropriate initial state for it.</p>

<div class="language-glsl highlighter-rouge"><div class="highlight"><pre class="highlight"><code><span class="k">uniform</span> <span class="kt">sampler2D</span> <span class="n">state</span><span class="p">;</span>
<span class="k">uniform</span> <span class="kt">vec2</span> <span class="n">scale</span><span class="p">;</span>

<span class="kt">int</span> <span class="nf">get</span><span class="p">(</span><span class="kt">int</span> <span class="n">x</span><span class="p">,</span> <span class="kt">int</span> <span class="n">y</span><span class="p">)</span> <span class="p">{</span>
    <span class="k">return</span> <span class="kt">int</span><span class="p">(</span><span class="n">texture2D</span><span class="p">(</span><span class="n">state</span><span class="p">,</span> <span class="p">(</span><span class="nb">gl_FragCoord</span><span class="p">.</span><span class="n">xy</span> <span class="o">+</span> <span class="kt">vec2</span><span class="p">(</span><span class="n">x</span><span class="p">,</span> <span class="n">y</span><span class="p">))</span> <span class="o">/</span> <span class="n">scale</span><span class="p">).</span><span class="n">r</span><span class="p">);</span>
<span class="p">}</span>

<span class="kt">void</span> <span class="nf">main</span><span class="p">()</span> <span class="p">{</span>
    <span class="kt">int</span> <span class="n">sum</span> <span class="o">=</span> <span class="n">get</span><span class="p">(</span><span class="o">-</span><span class="mi">1</span><span class="p">,</span> <span class="o">-</span><span class="mi">1</span><span class="p">)</span> <span class="o">+</span>
              <span class="n">get</span><span class="p">(</span><span class="o">-</span><span class="mi">1</span><span class="p">,</span>  <span class="mi">0</span><span class="p">)</span> <span class="o">+</span>
              <span class="n">get</span><span class="p">(</span><span class="o">-</span><span class="mi">1</span><span class="p">,</span>  <span class="mi">1</span><span class="p">)</span> <span class="o">+</span>
              <span class="n">get</span><span class="p">(</span> <span class="mi">0</span><span class="p">,</span> <span class="o">-</span><span class="mi">1</span><span class="p">)</span> <span class="o">+</span>
              <span class="n">get</span><span class="p">(</span> <span class="mi">0</span><span class="p">,</span>  <span class="mi">1</span><span class="p">)</span> <span class="o">+</span>
              <span class="n">get</span><span class="p">(</span> <span class="mi">1</span><span class="p">,</span> <span class="o">-</span><span class="mi">1</span><span class="p">)</span> <span class="o">+</span>
              <span class="n">get</span><span class="p">(</span> <span class="mi">1</span><span class="p">,</span>  <span class="mi">0</span><span class="p">)</span> <span class="o">+</span>
              <span class="n">get</span><span class="p">(</span> <span class="mi">1</span><span class="p">,</span>  <span class="mi">1</span><span class="p">);</span>
    <span class="k">if</span> <span class="p">(</span><span class="n">sum</span> <span class="o">==</span> <span class="mi">3</span><span class="p">)</span> <span class="p">{</span>
        <span class="nb">gl_FragColor</span> <span class="o">=</span> <span class="kt">vec4</span><span class="p">(</span><span class="mi">1</span><span class="p">.</span><span class="mi">0</span><span class="p">,</span> <span class="mi">1</span><span class="p">.</span><span class="mi">0</span><span class="p">,</span> <span class="mi">1</span><span class="p">.</span><span class="mi">0</span><span class="p">,</span> <span class="mi">1</span><span class="p">.</span><span class="mi">0</span><span class="p">);</span>
    <span class="p">}</span> <span class="k">else</span> <span class="k">if</span> <span class="p">(</span><span class="n">sum</span> <span class="o">==</span> <span class="mi">2</span><span class="p">)</span> <span class="p">{</span>
        <span class="kt">float</span> <span class="n">current</span> <span class="o">=</span> <span class="kt">float</span><span class="p">(</span><span class="n">get</span><span class="p">(</span><span class="mi">0</span><span class="p">,</span> <span class="mi">0</span><span class="p">));</span>
        <span class="nb">gl_FragColor</span> <span class="o">=</span> <span class="kt">vec4</span><span class="p">(</span><span class="n">current</span><span class="p">,</span> <span class="n">current</span><span class="p">,</span> <span class="n">current</span><span class="p">,</span> <span class="mi">1</span><span class="p">.</span><span class="mi">0</span><span class="p">);</span>
    <span class="p">}</span> <span class="k">else</span> <span class="p">{</span>
        <span class="nb">gl_FragColor</span> <span class="o">=</span> <span class="kt">vec4</span><span class="p">(</span><span class="mi">0</span><span class="p">.</span><span class="mi">0</span><span class="p">,</span> <span class="mi">0</span><span class="p">.</span><span class="mi">0</span><span class="p">,</span> <span class="mi">0</span><span class="p">.</span><span class="mi">0</span><span class="p">,</span> <span class="mi">1</span><span class="p">.</span><span class="mi">0</span><span class="p">);</span>
    <span class="p">}</span>
<span class="p">}</span>
</code></pre></div></div>

<p>The <code class="language-plaintext highlighter-rouge">get(int, int)</code> function returns the value of the cell at (x, y),
0 or 1. For the sake of simplicity, the output of the fragment shader
is solid white and black, but just sampling one channel (red) is good
enough to know the state of the cell. I’ve learned that loops and
arrays are are troublesome in GLSL, so I’ve manually unrolled the
neighbor check. Cellular automata that have more complex state could
make use of the other channels and perhaps even exploit alpha channel
blending in some special way.</p>

<p>Otherwise, this is just a straightforward encoding of the rules.</p>

<h3 id="displaying-the-state">Displaying the State</h3>

<p>What good is the simulation if the user doesn’t see anything? So far
all of the draw calls have been done on a custom framebuffer. Next
I’ll render the simulation state to the default framebuffer.</p>

<div class="language-javascript highlighter-rouge"><div class="highlight"><pre class="highlight"><code><span class="nx">GOL</span><span class="p">.</span><span class="nx">prototype</span><span class="p">.</span><span class="nx">draw</span> <span class="o">=</span> <span class="kd">function</span><span class="p">()</span> <span class="p">{</span>
    <span class="kd">var</span> <span class="nx">gl</span> <span class="o">=</span> <span class="k">this</span><span class="p">.</span><span class="nx">gl</span><span class="p">;</span>
    <span class="nx">gl</span><span class="p">.</span><span class="nx">bindFramebuffer</span><span class="p">(</span><span class="nx">gl</span><span class="p">.</span><span class="nx">FRAMEBUFFER</span><span class="p">,</span> <span class="kc">null</span><span class="p">);</span>
    <span class="nx">gl</span><span class="p">.</span><span class="nx">viewport</span><span class="p">(</span><span class="mi">0</span><span class="p">,</span> <span class="mi">0</span><span class="p">,</span> <span class="k">this</span><span class="p">.</span><span class="nx">viewsize</span><span class="p">.</span><span class="nx">x</span><span class="p">,</span> <span class="k">this</span><span class="p">.</span><span class="nx">viewsize</span><span class="p">.</span><span class="nx">y</span><span class="p">);</span>
    <span class="nx">gl</span><span class="p">.</span><span class="nx">bindTexture</span><span class="p">(</span><span class="nx">gl</span><span class="p">.</span><span class="nx">TEXTURE_2D</span><span class="p">,</span> <span class="k">this</span><span class="p">.</span><span class="nx">textures</span><span class="p">.</span><span class="nx">front</span><span class="p">);</span>
    <span class="k">this</span><span class="p">.</span><span class="nx">programs</span><span class="p">.</span><span class="nx">copy</span><span class="p">.</span><span class="nx">use</span><span class="p">()</span>
        <span class="p">.</span><span class="nx">attrib</span><span class="p">(</span><span class="dl">'</span><span class="s1">quad</span><span class="dl">'</span><span class="p">,</span> <span class="k">this</span><span class="p">.</span><span class="nx">buffers</span><span class="p">.</span><span class="nx">quad</span><span class="p">,</span> <span class="mi">2</span><span class="p">)</span>
        <span class="p">.</span><span class="nx">uniform</span><span class="p">(</span><span class="dl">'</span><span class="s1">state</span><span class="dl">'</span><span class="p">,</span> <span class="mi">0</span><span class="p">,</span> <span class="kc">true</span><span class="p">)</span>
        <span class="p">.</span><span class="nx">uniform</span><span class="p">(</span><span class="dl">'</span><span class="s1">scale</span><span class="dl">'</span><span class="p">,</span> <span class="k">this</span><span class="p">.</span><span class="nx">viewsize</span><span class="p">)</span>
        <span class="p">.</span><span class="nx">draw</span><span class="p">(</span><span class="nx">gl</span><span class="p">.</span><span class="nx">TRIANGLE_STRIP</span><span class="p">,</span> <span class="mi">4</span><span class="p">);</span>
    <span class="k">return</span> <span class="k">this</span><span class="p">;</span>
<span class="p">};</span>
</code></pre></div></div>

<p>First, bind the default framebuffer as the current buffer. There’s no
actual handle for the default framebuffer, so using <code class="language-plaintext highlighter-rouge">null</code> sets it to
the default. Next, set the viewport to the size of the display. Then
use the “copy” program to copy the state to the default framebuffer
where the user will see it. One pixel per cell is <em>far</em> too small, so
it will be scaled as a consequence of <code class="language-plaintext highlighter-rouge">this.viewsize</code> being four times
larger.</p>

<p>Here’s what the “copy” fragment shader looks like. It’s so simple
because I’m storing the simulation state in black and white. If the
state was in a different format than the display format, this shader
would need to perform the translation.</p>

<div class="language-glsl highlighter-rouge"><div class="highlight"><pre class="highlight"><code><span class="k">uniform</span> <span class="kt">sampler2D</span> <span class="n">state</span><span class="p">;</span>
<span class="k">uniform</span> <span class="kt">vec2</span> <span class="n">scale</span><span class="p">;</span>

<span class="kt">void</span> <span class="nf">main</span><span class="p">()</span> <span class="p">{</span>
    <span class="nb">gl_FragColor</span> <span class="o">=</span> <span class="n">texture2D</span><span class="p">(</span><span class="n">state</span><span class="p">,</span> <span class="nb">gl_FragCoord</span><span class="p">.</span><span class="n">xy</span> <span class="o">/</span> <span class="n">scale</span><span class="p">);</span>
<span class="p">}</span>

</code></pre></div></div>

<p>Since I’m scaling up by four — i.e. 16 pixels per cell — this
fragment shader is run 16 times per simulation cell. Since I used
<code class="language-plaintext highlighter-rouge">GL_NEAREST</code> on the texture there’s no funny business going on here.
If I had used <code class="language-plaintext highlighter-rouge">GL_LINEAR</code>, it would look blurry.</p>

<p>You might notice I’m passing in a <code class="language-plaintext highlighter-rouge">scale</code> uniform and using
<code class="language-plaintext highlighter-rouge">gl_FragCoord</code>. The <code class="language-plaintext highlighter-rouge">gl_FragCoord</code> variable is in window-relative
coordinates, but when I sample a texture I need unit coordinates:
values between 0 and 1. To get this, I divide <code class="language-plaintext highlighter-rouge">gl_FragCoord</code> by the
size of the viewport. Alternatively I could pass the coordinates as a
varying from the vertex shader, automatically interpolated between the
quad vertices.</p>

<p>An important thing to notice is that <strong>the simulation state never
leaves the GPU</strong>. It’s updated there and it’s drawn there. The CPU is
operating the simulation like the strings on a marionette — <em>from a
thousand feet up in the air</em>.</p>

<h3 id="user-interaction">User Interaction</h3>

<p>What good is a Game of Life simulation if you can’t poke at it? If all
of the state is on the GPU, how can I modify it? This is where
<code class="language-plaintext highlighter-rouge">glTexSubImage2D()</code> comes in. As its name implies, it’s used to set
the values of some portion of a texture. I want to write a <code class="language-plaintext highlighter-rouge">poke()</code>
method that uses this OpenGL function to set a single cell.</p>

<div class="language-javascript highlighter-rouge"><div class="highlight"><pre class="highlight"><code><span class="nx">GOL</span><span class="p">.</span><span class="nx">prototype</span><span class="p">.</span><span class="nx">poke</span> <span class="o">=</span> <span class="kd">function</span><span class="p">(</span><span class="nx">x</span><span class="p">,</span> <span class="nx">y</span><span class="p">,</span> <span class="nx">value</span><span class="p">)</span> <span class="p">{</span>
    <span class="kd">var</span> <span class="nx">gl</span> <span class="o">=</span> <span class="k">this</span><span class="p">.</span><span class="nx">gl</span><span class="p">,</span>
        <span class="nx">v</span> <span class="o">=</span> <span class="nx">value</span> <span class="o">*</span> <span class="mi">255</span><span class="p">;</span>
    <span class="nx">gl</span><span class="p">.</span><span class="nx">bindTexture</span><span class="p">(</span><span class="nx">gl</span><span class="p">.</span><span class="nx">TEXTURE_2D</span><span class="p">,</span> <span class="k">this</span><span class="p">.</span><span class="nx">textures</span><span class="p">.</span><span class="nx">front</span><span class="p">);</span>
    <span class="nx">gl</span><span class="p">.</span><span class="nx">texSubImage2D</span><span class="p">(</span><span class="nx">gl</span><span class="p">.</span><span class="nx">TEXTURE_2D</span><span class="p">,</span> <span class="mi">0</span><span class="p">,</span> <span class="nx">x</span><span class="p">,</span> <span class="nx">y</span><span class="p">,</span> <span class="mi">1</span><span class="p">,</span> <span class="mi">1</span><span class="p">,</span>
                     <span class="nx">gl</span><span class="p">.</span><span class="nx">RGBA</span><span class="p">,</span> <span class="nx">gl</span><span class="p">.</span><span class="nx">UNSIGNED_BYTE</span><span class="p">,</span>
                     <span class="k">new</span> <span class="nb">Uint8Array</span><span class="p">([</span><span class="nx">v</span><span class="p">,</span> <span class="nx">v</span><span class="p">,</span> <span class="nx">v</span><span class="p">,</span> <span class="mi">255</span><span class="p">]));</span>
    <span class="k">return</span> <span class="k">this</span><span class="p">;</span>
<span class="p">};</span>
</code></pre></div></div>

<p>Bind the front texture, set the region at (x, y) of size 1x1 (a single
pixel) to a very specific RGBA value. There’s nothing else to it. If
you click on the simulation in my demo, it will call this poke method.
This method could also be used to initialize the entire simulation
with random values, though it wouldn’t be very efficient doing it one
pixel at a time.</p>

<h3 id="getting-the-state">Getting the State</h3>

<p>What if you wanted to read the simulation state into CPU memory,
perhaps to store for reloading later? So far I can set the state and
step the simulation, but there’s been no way to get at the data.
Unfortunately I can’t directly access texture data. There’s nothing
like the inverse of <code class="language-plaintext highlighter-rouge">glTexSubImage2D()</code>. Here are a few options:</p>

<ul>
  <li>
    <p>Call <code class="language-plaintext highlighter-rouge">toDataURL()</code> on the canvas. This would grab the rendering of
the simulation, which would need to be translated back into
simulation state. Sounds messy.</p>
  </li>
  <li>
    <p>Take a screenshot. Basically the same idea, but even messier.</p>
  </li>
  <li>
    <p>Use <code class="language-plaintext highlighter-rouge">glReadPixels()</code> on a framebuffer. The texture can be attached to
a framebuffer, then read through the framebuffer. This is the right
solution.</p>
  </li>
</ul>

<p>I’m reusing the “step” framebuffer for this since it’s already
intended for these textures to be its attachments.</p>

<div class="language-javascript highlighter-rouge"><div class="highlight"><pre class="highlight"><code><span class="nx">GOL</span><span class="p">.</span><span class="nx">prototype</span><span class="p">.</span><span class="kd">get</span> <span class="o">=</span> <span class="kd">function</span><span class="p">()</span> <span class="p">{</span>
    <span class="kd">var</span> <span class="nx">gl</span> <span class="o">=</span> <span class="k">this</span><span class="p">.</span><span class="nx">gl</span><span class="p">,</span> <span class="nx">w</span> <span class="o">=</span> <span class="k">this</span><span class="p">.</span><span class="nx">statesize</span><span class="p">.</span><span class="nx">x</span><span class="p">,</span> <span class="nx">h</span> <span class="o">=</span> <span class="k">this</span><span class="p">.</span><span class="nx">statesize</span><span class="p">.</span><span class="nx">y</span><span class="p">;</span>
    <span class="nx">gl</span><span class="p">.</span><span class="nx">bindFramebuffer</span><span class="p">(</span><span class="nx">gl</span><span class="p">.</span><span class="nx">FRAMEBUFFER</span><span class="p">,</span> <span class="k">this</span><span class="p">.</span><span class="nx">framebuffers</span><span class="p">.</span><span class="nx">step</span><span class="p">);</span>
    <span class="nx">gl</span><span class="p">.</span><span class="nx">framebufferTexture2D</span><span class="p">(</span><span class="nx">gl</span><span class="p">.</span><span class="nx">FRAMEBUFFER</span><span class="p">,</span> <span class="nx">gl</span><span class="p">.</span><span class="nx">COLOR_ATTACHMENT0</span><span class="p">,</span>
                            <span class="nx">gl</span><span class="p">.</span><span class="nx">TEXTURE_2D</span><span class="p">,</span> <span class="k">this</span><span class="p">.</span><span class="nx">textures</span><span class="p">.</span><span class="nx">front</span><span class="p">,</span> <span class="mi">0</span><span class="p">);</span>
    <span class="kd">var</span> <span class="nx">rgba</span> <span class="o">=</span> <span class="k">new</span> <span class="nb">Uint8Array</span><span class="p">(</span><span class="nx">w</span> <span class="o">*</span> <span class="nx">h</span> <span class="o">*</span> <span class="mi">4</span><span class="p">);</span>
    <span class="nx">gl</span><span class="p">.</span><span class="nx">readPixels</span><span class="p">(</span><span class="mi">0</span><span class="p">,</span> <span class="mi">0</span><span class="p">,</span> <span class="nx">w</span><span class="p">,</span> <span class="nx">h</span><span class="p">,</span> <span class="nx">gl</span><span class="p">.</span><span class="nx">RGBA</span><span class="p">,</span> <span class="nx">gl</span><span class="p">.</span><span class="nx">UNSIGNED_BYTE</span><span class="p">,</span> <span class="nx">rgba</span><span class="p">);</span>
    <span class="k">return</span> <span class="nx">rgba</span><span class="p">;</span>
<span class="p">};</span>
</code></pre></div></div>

<p>Voilà! This <code class="language-plaintext highlighter-rouge">rgba</code> array can be passed directly back to
<code class="language-plaintext highlighter-rouge">glTexSubImage2D()</code> as a perfect snapshot of the simulation state.</p>

<h3 id="conclusion">Conclusion</h3>

<p>This project turned out to be far simpler than I anticipated, so much
so that I was able to get the simulation running within an evening’s
effort. I learned a whole lot more about WebGL in the process, enough
for me to revisit <a href="/blog/2013/06/26/">my WebGL liquid simulation</a>. It uses a
similar texture-drawing technique, which I really fumbled through that
first time. I dramatically cleaned it up, making it fast enough to run
smoothly on my mobile devices.</p>

<p>Also, this Game of Life implementation is <em>blazing</em> fast. If rendering
is skipped, <strong>it can run a 2048x2048 Game of Life at over 18,000
iterations per second!</strong> However, this isn’t terribly useful because
it hits its steady state well before that first second has passed.</p>

]]>
    </content>
  </entry>


  <entry>
    <title>A GPU Approach to Voronoi Diagrams</title>
    <link rel="alternate" type="text/html" href="https://nullprogram.com/blog/2014/06/01/"/>
    <id>urn:uuid:97759105-8995-34d3-c914-a84eb7eb762c</id>
    <updated>2014-06-01T21:53:48Z</updated>
    <category term="webgl"/><category term="media"/><category term="video"/><category term="math"/><category term="interactive"/><category term="gpgpu"/><category term="opengl"/>
    <content type="html">
      <![CDATA[<p>I recently got an itch to play around with <a href="http://en.wikipedia.org/wiki/Voronoi_diagram">Voronoi diagrams</a>.
It’s a diagram that divides a space into regions composed of points
closest to one of a set of seed points. There are a couple of
algorithms for computing a Voronoi diagram: Bowyer-Watson and Fortune.
These are complicated and difficult to implement.</p>

<p>However, if we’re interested only in <em>rendering</em> a Voronoi diagram as
a bitmap, there’s a trivial brute for algorithm. For every pixel of
output, determine the closest seed vertex and color that pixel
appropriately. It’s slow, especially as the number of seed vertices
goes up, but it works perfectly and it’s dead simple!</p>

<p>Does this strategy seem familiar? It sure sounds a lot like an OpenGL
<em>fragment shader</em>! With a shader, I can push the workload off to the
GPU, which is intended for this sort of work. Here’s basically what it
looks like.</p>

<div class="language-glsl highlighter-rouge"><div class="highlight"><pre class="highlight"><code><span class="cm">/* voronoi.frag */</span>
<span class="k">uniform</span> <span class="kt">vec2</span> <span class="n">seeds</span><span class="p">[</span><span class="mi">32</span><span class="p">];</span>
<span class="k">uniform</span> <span class="kt">vec3</span> <span class="n">colors</span><span class="p">[</span><span class="mi">32</span><span class="p">];</span>

<span class="kt">void</span> <span class="nf">main</span><span class="p">()</span> <span class="p">{</span>
    <span class="kt">float</span> <span class="n">dist</span> <span class="o">=</span> <span class="n">distance</span><span class="p">(</span><span class="n">seeds</span><span class="p">[</span><span class="mi">0</span><span class="p">],</span> <span class="nb">gl_FragCoord</span><span class="p">.</span><span class="n">xy</span><span class="p">);</span>
    <span class="kt">vec3</span> <span class="n">color</span> <span class="o">=</span> <span class="n">colors</span><span class="p">[</span><span class="mi">0</span><span class="p">];</span>
    <span class="k">for</span> <span class="p">(</span><span class="kt">int</span> <span class="n">i</span> <span class="o">=</span> <span class="mi">1</span><span class="p">;</span> <span class="n">i</span> <span class="o">&lt;</span> <span class="mi">32</span><span class="p">;</span> <span class="n">i</span><span class="o">++</span><span class="p">)</span> <span class="p">{</span>
        <span class="kt">float</span> <span class="n">current</span> <span class="o">=</span> <span class="n">distance</span><span class="p">(</span><span class="n">seeds</span><span class="p">[</span><span class="n">i</span><span class="p">],</span> <span class="nb">gl_FragCoord</span><span class="p">.</span><span class="n">xy</span><span class="p">);</span>
        <span class="k">if</span> <span class="p">(</span><span class="n">current</span> <span class="o">&lt;</span> <span class="n">dist</span><span class="p">)</span> <span class="p">{</span>
            <span class="n">color</span> <span class="o">=</span> <span class="n">colors</span><span class="p">[</span><span class="n">i</span><span class="p">];</span>
            <span class="n">dist</span> <span class="o">=</span> <span class="n">current</span><span class="p">;</span>
        <span class="p">}</span>
    <span class="p">}</span>
    <span class="nb">gl_FragColor</span> <span class="o">=</span> <span class="kt">vec4</span><span class="p">(</span><span class="n">color</span><span class="p">,</span> <span class="mi">1</span><span class="p">.</span><span class="mi">0</span><span class="p">);</span>
<span class="p">}</span>
</code></pre></div></div>

<p>If you have a WebGL-enabled browser, you can see the results for
yourself here. Now, as I’ll explain below, what you see here isn’t
really this shader, but the result looks identical. There are two
different WebGL implementations included, but only the smarter one is
active. (There’s also a really slow HTML5 canvas fallback.)</p>

<ul>
  <li><a href="http://skeeto.github.io/voronoi-toy/">https://skeeto.github.io/voronoi-toy/</a>
(<a href="http://github.com/skeeto/voronoi-toy">source</a>)</li>
</ul>

<p>You can click and drag points around the diagram with your mouse. You
can add and remove points with left and right clicks. And if you press
the “a” key, the seed points will go for a random walk, animating the
whole diagram. Here’s a (HTML5) video showing it off.</p>

<video width="500" height="280" controls="" preload="metadata">
  <source src="https://nullprogram.s3.amazonaws.com/voronoi/voronoi.webm" type="video/webm" />
  <source src="https://nullprogram.s3.amazonaws.com/voronoi/voronoi.mp4" type="video/mp4" />
</video>

<p>Unfortunately, there are some serious problems with this approach. It
has to do with passing seed information as uniforms.</p>

<ol>
  <li>
    <p><strong>The number of seed vertices is hardcoded.</strong> The shader language
requires uniform arrays to have known lengths at compile-time. If I
want to increase the number of seed vertices, I need to generate,
compile, and link a new shader to replace it. My implementation
actually does this. The number is replaced with a <code class="language-plaintext highlighter-rouge">%%MAX%%</code>
template that I fill in using a regular expression before sending
the program off to the GPU.</p>
  </li>
  <li>
    <p><strong>The number of available uniform bindings is very constrained</strong>,
even on high-end GPUs: <code class="language-plaintext highlighter-rouge">GL_MAX_FRAGMENT_UNIFORM_VECTORS</code>. This
value is allowed to be as small as 16! A typical value on high-end
graphics cards is a mere 221. Each array element counts as a
binding, so our shader may be limited to as few as 8 seed vertices.
Even on nice GPUs, we’re absolutely limited to 110 seed vertices.
An alternative approach might be passing seed and color information
as a texture, but I didn’t try this.</p>
  </li>
  <li>
    <p><strong>There’s no way to bail out of the loop early</strong>, at least with
OpenGL ES 2.0 (WebGL) shaders. We can’t <code class="language-plaintext highlighter-rouge">break</code> or do any sort of
branching on the loop variable. Even if we only have 4 seed
vertices, we still have to compare against the full count. The GPU
has plenty of time available, so this wouldn’t be a big issue,
except that we need to skip over the “unused” seeds somehow. They
need to be given unreasonable position values. Infinity would be an
unreasonable value (infinitely far away), but GLSL floats aren’t
guaranteed to be able to represent infinity. We can’t even know
what the maximum floating-point value might be. If we pick
something too large, we get an overflow garbage value, such as 0
(!!!) in my experiments.</p>
  </li>
</ol>

<p>Because of these limitations, this is not a very good way of going
about computing Voronoi diagrams on a GPU. Fortunately there’s a
<em>much</em> much better approach!</p>

<h3 id="a-smarter-approach">A Smarter Approach</h3>

<p>With the above implemented, I was playing around with the fragment
shader, going beyond solid colors. For example, I changed the
shade/color based on distance from the seed vertex. A results of this
was this “blood cell” image, a difference of a couple lines in the
shader.</p>

<p><a href="https://nullprogram.s3.amazonaws.com/voronoi/blood.png">
  <img src="https://nullprogram.s3.amazonaws.com/voronoi/blood.png" width="500" height="312" />
</a></p>

<p>That’s when it hit me! Render each seed as cone pointed towards the
camera in an orthographic projection, coloring each cone according to
the seed’s color. The Voronoi diagram would work itself out
<em>automatically</em> in the depth buffer. That is, rather than do all this
distance comparison in the shader, let OpenGL do its normal job of
figuring out the scene geometry.</p>

<p>Here’s a video (<a href="https://nullprogram.s3.amazonaws.com/voronoi/voronoi-cones.gif">GIF</a>) I made that demonstrates what I mean.</p>

<video width="500" height="500" controls="" preload="metadata">
  <source src="https://nullprogram.s3.amazonaws.com/voronoi/voronoi-cones.webm" type="video/webm" />
  <source src="https://nullprogram.s3.amazonaws.com/voronoi/voronoi-cones.mp4" type="video/mp4" />
  <img src="https://nullprogram.s3.amazonaws.com/voronoi/voronoi-cones.gif" width="500" height="500" />
</video>

<p>Not only is this much faster, it’s also far simpler! Rather than being
limited to a hundred or so seed vertices, this version could literally
do millions of them, limited only by the available memory for
attribute buffers.</p>

<h4 id="the-resolution-catch">The Resolution Catch</h4>

<p>There’s a catch, though. There’s no way to perfectly represent a cone
in OpenGL. (And if there was, we’d be back at the brute force approach
as above anyway.) The cone must be built out of primitive triangles,
sort of like pizza slices, using <code class="language-plaintext highlighter-rouge">GL_TRIANGLE_FAN</code> mode. Here’s a cone
made of 16 triangles.</p>

<p><img src="https://nullprogram.s3.amazonaws.com/voronoi/triangle-fan.png" alt="" /></p>

<p>Unlike the previous brute force approach, this is an <em>approximation</em>
of the Voronoi diagram. The more triangles, the better the
approximation, converging on the precision of the initial brute force
approach. I found that for this project, about 64 triangles was
indistinguishable from brute force.</p>

<p><img src="https://nullprogram.s3.amazonaws.com/voronoi/resolution.gif" width="500" height="500" /></p>

<h4 id="instancing-to-the-rescue">Instancing to the Rescue</h4>

<p>At this point things are looking pretty good. On my desktop, I can
maintain 60 frames-per-second for up to about 500 seed vertices moving
around randomly (“a”). After this, it becomes <em>draw-bound</em> because
each seed vertex requires a separate glDrawArrays() call to OpenGL.
The workaround for this is an OpenGL extension called instancing. The
<a href="http://blog.tojicode.com/2013/07/webgl-instancing-with.html">WebGL extension for instancing</a> is <code class="language-plaintext highlighter-rouge">ANGLE_instanced_arrays</code>.</p>

<p>The cone model was already sent to the GPU during initialization, so,
without instancing, the draw loop only has to bind the uniforms and
call draw for each seed. This code uses my <a href="https://github.com/skeeto/igloojs">Igloo WebGL
library</a> to simplify the API.</p>

<div class="language-js highlighter-rouge"><div class="highlight"><pre class="highlight"><code><span class="kd">var</span> <span class="nx">cone</span> <span class="o">=</span> <span class="nx">programs</span><span class="p">.</span><span class="nx">cone</span><span class="p">.</span><span class="nx">use</span><span class="p">()</span>
        <span class="p">.</span><span class="nx">attrib</span><span class="p">(</span><span class="dl">'</span><span class="s1">cone</span><span class="dl">'</span><span class="p">,</span> <span class="nx">buffers</span><span class="p">.</span><span class="nx">cone</span><span class="p">,</span> <span class="mi">3</span><span class="p">);</span>
<span class="k">for</span> <span class="p">(</span><span class="kd">var</span> <span class="nx">i</span> <span class="o">=</span> <span class="mi">0</span><span class="p">;</span> <span class="nx">i</span> <span class="o">&lt;</span> <span class="nx">seeds</span><span class="p">.</span><span class="nx">length</span><span class="p">;</span> <span class="nx">i</span><span class="o">++</span><span class="p">)</span> <span class="p">{</span>
    <span class="nx">cone</span><span class="p">.</span><span class="nx">uniform</span><span class="p">(</span><span class="dl">'</span><span class="s1">color</span><span class="dl">'</span><span class="p">,</span> <span class="nx">seeds</span><span class="p">[</span><span class="nx">i</span><span class="p">].</span><span class="nx">color</span><span class="p">)</span>
        <span class="p">.</span><span class="nx">uniform</span><span class="p">(</span><span class="dl">'</span><span class="s1">position</span><span class="dl">'</span><span class="p">,</span> <span class="nx">seeds</span><span class="p">[</span><span class="nx">i</span><span class="p">].</span><span class="nx">position</span><span class="p">)</span>
        <span class="p">.</span><span class="nx">draw</span><span class="p">(</span><span class="nx">gl</span><span class="p">.</span><span class="nx">TRIANGLE_FAN</span><span class="p">,</span> <span class="mi">66</span><span class="p">);</span>  <span class="c1">// 64 triangles == 66 verts</span>
<span class="p">}</span>
</code></pre></div></div>

<p>It’s driving this pair of shaders.</p>

<div class="language-glsl highlighter-rouge"><div class="highlight"><pre class="highlight"><code><span class="cm">/* cone.vert */</span>
<span class="k">attribute</span> <span class="kt">vec3</span> <span class="n">cone</span><span class="p">;</span>
<span class="k">uniform</span> <span class="kt">vec2</span> <span class="n">position</span><span class="p">;</span>

<span class="kt">void</span> <span class="nf">main</span><span class="p">()</span> <span class="p">{</span>
    <span class="nb">gl_Position</span> <span class="o">=</span> <span class="kt">vec4</span><span class="p">(</span><span class="n">cone</span><span class="p">.</span><span class="n">xy</span> <span class="o">+</span> <span class="n">position</span><span class="p">,</span> <span class="n">cone</span><span class="p">.</span><span class="n">z</span><span class="p">,</span> <span class="mi">1</span><span class="p">.</span><span class="mi">0</span><span class="p">);</span>
<span class="p">}</span>
</code></pre></div></div>

<div class="language-glsl highlighter-rouge"><div class="highlight"><pre class="highlight"><code><span class="cm">/* cone.frag */</span>
<span class="k">uniform</span> <span class="kt">vec3</span> <span class="n">color</span><span class="p">;</span>

<span class="kt">void</span> <span class="nf">main</span><span class="p">()</span> <span class="p">{</span>
    <span class="nb">gl_FragColor</span> <span class="o">=</span> <span class="kt">vec4</span><span class="p">(</span><span class="n">color</span><span class="p">,</span> <span class="mi">1</span><span class="p">.</span><span class="mi">0</span><span class="p">);</span>
<span class="p">}</span>
</code></pre></div></div>

<p>Instancing works by adjusting how attributes are stepped. Normally the
vertex shader runs once per element, but instead we can ask that some
attributes step once per <em>instance</em>, or even once per multiple
instances. Uniforms are then converted to vertex attribs and the
“loop” runs implicitly on the GPU. The instanced glDrawArrays() call
takes one additional argument: the number of instances to draw.</p>

<div class="language-js highlighter-rouge"><div class="highlight"><pre class="highlight"><code><span class="nx">ext</span> <span class="o">=</span> <span class="nx">gl</span><span class="p">.</span><span class="nx">getExtension</span><span class="p">(</span><span class="dl">"</span><span class="s2">ANGLE_instanced_arrays</span><span class="dl">"</span><span class="p">);</span> <span class="c1">// only once</span>

<span class="nx">programs</span><span class="p">.</span><span class="nx">cone</span><span class="p">.</span><span class="nx">use</span><span class="p">()</span>
    <span class="p">.</span><span class="nx">attrib</span><span class="p">(</span><span class="dl">'</span><span class="s1">cone</span><span class="dl">'</span><span class="p">,</span> <span class="nx">buffers</span><span class="p">.</span><span class="nx">cone</span><span class="p">,</span> <span class="mi">3</span><span class="p">)</span>
    <span class="p">.</span><span class="nx">attrib</span><span class="p">(</span><span class="dl">'</span><span class="s1">position</span><span class="dl">'</span><span class="p">,</span> <span class="nx">buffers</span><span class="p">.</span><span class="nx">positions</span><span class="p">,</span> <span class="mi">2</span><span class="p">)</span>
    <span class="p">.</span><span class="nx">attrib</span><span class="p">(</span><span class="dl">'</span><span class="s1">color</span><span class="dl">'</span><span class="p">,</span> <span class="nx">buffers</span><span class="p">.</span><span class="nx">colors</span><span class="p">,</span> <span class="mi">3</span><span class="p">);</span>
<span class="cm">/* Tell OpenGL these iterate once (1) per instance. */</span>
<span class="nx">ext</span><span class="p">.</span><span class="nx">vertexAttribDivisorANGLE</span><span class="p">(</span><span class="nx">cone</span><span class="p">.</span><span class="nx">vars</span><span class="p">[</span><span class="dl">'</span><span class="s1">position</span><span class="dl">'</span><span class="p">],</span> <span class="mi">1</span><span class="p">);</span>
<span class="nx">ext</span><span class="p">.</span><span class="nx">vertexAttribDivisorANGLE</span><span class="p">(</span><span class="nx">cone</span><span class="p">.</span><span class="nx">vars</span><span class="p">[</span><span class="dl">'</span><span class="s1">color</span><span class="dl">'</span><span class="p">],</span> <span class="mi">1</span><span class="p">);</span>
<span class="nx">ext</span><span class="p">.</span><span class="nx">drawArraysInstancedANGLE</span><span class="p">(</span><span class="nx">gl</span><span class="p">.</span><span class="nx">TRIANGLE_FAN</span><span class="p">,</span> <span class="mi">0</span><span class="p">,</span> <span class="mi">66</span><span class="p">,</span> <span class="nx">seeds</span><span class="p">.</span><span class="nx">length</span><span class="p">);</span>
</code></pre></div></div>

<p>The ugly ANGLE names are because this is an extension, not part of
WebGL itself. As such, my program will fall back to use multiple draw
calls when the extension is not available. It’s only there for a speed
boost.</p>

<p>Here are the new shaders. Notice the uniforms are gone.</p>

<div class="language-glsl highlighter-rouge"><div class="highlight"><pre class="highlight"><code><span class="cm">/* cone-instanced.vert */</span>
<span class="k">attribute</span> <span class="kt">vec3</span> <span class="n">cone</span><span class="p">;</span>
<span class="k">attribute</span> <span class="kt">vec2</span> <span class="n">position</span><span class="p">;</span>
<span class="k">attribute</span> <span class="kt">vec3</span> <span class="n">color</span><span class="p">;</span>

<span class="k">varying</span> <span class="kt">vec3</span> <span class="n">vcolor</span><span class="p">;</span>

<span class="kt">void</span> <span class="nf">main</span><span class="p">()</span> <span class="p">{</span>
    <span class="n">vcolor</span> <span class="o">=</span> <span class="n">color</span><span class="p">;</span>
    <span class="nb">gl_Position</span> <span class="o">=</span> <span class="kt">vec4</span><span class="p">(</span><span class="n">cone</span><span class="p">.</span><span class="n">xy</span> <span class="o">+</span> <span class="n">position</span><span class="p">,</span> <span class="n">cone</span><span class="p">.</span><span class="n">z</span><span class="p">,</span> <span class="mi">1</span><span class="p">.</span><span class="mi">0</span><span class="p">);</span>
<span class="p">}</span>
</code></pre></div></div>

<div class="language-glsl highlighter-rouge"><div class="highlight"><pre class="highlight"><code><span class="cm">/* cone-instanced.frag */</span>
<span class="k">varying</span> <span class="kt">vec3</span> <span class="n">vcolor</span><span class="p">;</span>

<span class="kt">void</span> <span class="nf">main</span><span class="p">()</span> <span class="p">{</span>
    <span class="nb">gl_FragColor</span> <span class="o">=</span> <span class="kt">vec4</span><span class="p">(</span><span class="n">vcolor</span><span class="p">,</span> <span class="mi">1</span><span class="p">.</span><span class="mi">0</span><span class="p">);</span>
<span class="p">}</span>
</code></pre></div></div>

<p>On the same machine, the instancing version can do a few thousand seed
vertices (an order of magnitude more) at 60 frames-per-second, after
which it becomes bandwidth saturated. This is because, for the
animation, every vertex position is updated on the GPU on each frame.
At this point it’s overcrowded anyway, so there’s no need to support
more.</p>

]]>
    </content>
  </entry>


  <entry>
    <title>Liquid Simulation in WebGL</title>
    <link rel="alternate" type="text/html" href="https://nullprogram.com/blog/2013/06/26/"/>
    <id>urn:uuid:a0e42262-19a8-3208-4a5b-b70485f5ae8a</id>
    <updated>2013-06-26T00:00:00Z</updated>
    <category term="javascript"/><category term="interactive"/><category term="webgl"/><category term="opengl"/>
    <content type="html">
      <![CDATA[<p>Over a year ago I implemented
<a href="/blog/2012/02/03/">a liquid simulation using a Box2D and Java 2D</a>. It’s a neat
trick that involves simulating a bunch of balls in a container,
blurring the rendering of this simulation, and finally thresholding
the blurred rendering. Due to <a href="/blog/2013/06/10/">my recent affection for WebGL</a>,
this week I ported the whole thing to JavaScript and WebGL.</p>

<ul>
  <li><a href="/fun-liquid/webgl/">nullprogram.com/fun-liquid/webgl/</a></li>
</ul>

<p>Unlike the previous Java version, blurring and thresholding is
performed entirely on the GPU. It <em>should</em> therefore be less CPU
intensive and a lot more GPU intensive. Assuming a decent GPU, it will
run at a (fixed) 60 FPS, as opposed to the mere 30 FPS I could squeeze
out of the old version. Other than this, the JavaScript version should
look pretty much identical to the Java version.</p>

<h3 id="box2d-performance">Box2D performance</h3>

<p>I ran into a few complications while porting. The first was the
performance of Box2D. I started out by using <a href="http://code.google.com/p/box2dweb/">box2dweb</a>,
which is a port of Box2DFlash, which is itself a port of Box2D. Even
on V8, the performance was poor enough that I couldn’t simulate enough
balls to achieve the liquid effect. The original JBox2D version
handles 400 balls just fine while this one was struggling to do about
40.</p>

<p><a href="http://www.50ply.com/">Brian</a> suggested I try out
<a href="https://github.com/kripken/box2d.js/">the Box2D emscripten port</a>. Rather than manually port Box2D
to JavaScript, emscripten compiles the original C++ to JavaScript via
LLVM, being so direct as to even maintain its own heap. The benefit is
much better performance, but the cost is a difficult API. Interacting
with emscripten-compiled code can be rather cumbersome, and this
emscripten port isn’t yet fully worked out. For example, creating a
PolygonShape object involves allocating an array on the emscripten
heap and manipulating a pointer-like thing. And when you screw up, the
error messages are completely unhelpful.</p>

<p>Moving to this other version of Box2D allowed me to increase the
number of balls to about 150, which is just enough to pull off the
effect. I’m still a bit surprised how slow this is. The computation
complexity for this is something like an O(n^2), so 150 is a long ways
behind 400. I may revisit this in the future to try to get better
performance by crafting my own very specialized physics engine from
scratch.</p>

<h3 id="webgl-complexity">WebGL complexity</h3>

<p>Before I even got into writing the WebGL component of this, I
implemented a 2D canvas display, without any blurring, just for
getting Box2D tuned. If you visit the demonstration page without a
WebGL-capable browser you’ll see this plain canvas display.</p>

<p>Getting WebGL to do the same thing was very simple. I used <code class="language-plaintext highlighter-rouge">GL_POINTS</code>
to draw the balls just like I had done with <a href="/sphere-js/">the sphere demo</a>.
To do blurring I would need to render this first stage onto an
intermediate framebuffer, then using this framebuffer as an input
texture I would blur and threshold this into the default framebuffer.</p>

<p>This actually took me awhile to work out, much longer than I had
anticipated. To prepare this intermediate framebuffer you must first
create and configure a texture. Then create and configure a
<em>render</em>buffer to fill in as the depth buffer. Then finally create the
framebuffer and attach both of these to it. Skip any step and all you
get are some vague WebGL warnings. (With regular OpenGL it’s worse,
since you get no automatic warnings at all.)</p>

<p>WebGL textures must have dimensions that are powers of two. However,
my final output does not. Carefully rendering onto a texture with a
different aspect ratio and properly sampling the results back off
introduces an intermediate coordinate system which mucks things up a
bit. It took me some time to wrap my head around it to work everything
out.</p>

<p>Finally, once I was nearly done, my fancy new shader was consistently
causing OpenGL to crash, taking my browser down with it. I had to
switch to a different computer to continue developing.</p>

<h4 id="the-gpu-as-a-bottleneck">The GPU as a bottleneck</h4>

<p>For the second time since I’ve picked up WebGL I have overestimated
graphics cards’ performance capabilities. It turns out my CPU is
faster at convolving a 25x25 kernel — the size of the convolution
kernel in the Java version — than any GPU that I have access to. If I
reduce the size of the kernel the GPU gets its edge back. The only way
to come close to 25x25 on the GPU is to cut some corners. I finally
settled on an 19x19 kernel, which seems to work just about as well
without being horribly slow. I may revisit this in the future so that
lower-end GPUs can run this at 60 FPS as well.</p>

<h3 id="conclusion">Conclusion</h3>

<p>I’m really happy with the results, and writing this has been a good
exercise in OpenGL. I completely met one of my original goals: to look
practically identical to the original Java version. I <em>mostly</em> met my
second, performance goal. On my nice desktop computer it runs more
than twice as fast, but, unfortunately, it’s very slow my tablet. If I
revisit this project in the future, the purpose will be to optimize
for these lower-end, mobile devices.</p>

<p>This project has also been a useful testbed for a low-level WebGL
wrapper library I’m working on called <a href="https://github.com/skeeto/igloojs">Igloo</a>, which I’ll cover
in a future post.</p>

]]>
    </content>
  </entry>


  <entry>
    <title>Long Live WebGL</title>
    <link rel="alternate" type="text/html" href="https://nullprogram.com/blog/2013/06/10/"/>
    <id>urn:uuid:75a9dce9-79f1-388e-f5f9-578cbb5b8800</id>
    <updated>2013-06-10T00:00:00Z</updated>
    <category term="javascript"/><category term="interactive"/><category term="web"/><category term="webgl"/><category term="opengl"/>
    <content type="html">
      <![CDATA[<p>On several occasions over the last few years I’ve tried to get into
OpenGL programming. I’d sink an afternoon into attempting to learn it,
only to get frustrated and quit without learning much. There’s a lot
of outdated and downright poor information out there, and a beginner
can’t tell the good from the bad. I tried using OpenGL from C++, then
Java (<a href="http://www.lwjgl.org/">lwjgl</a>), then finally JavaScript (<a href="http://en.wikipedia.org/wiki/WebGL">WebGL</a>). This
last one is what finally stuck, unlocking a new world of projects for
me. It’s been very empowering!</p>

<p>I’ll explain why WebGL is what finally made OpenGL click for me.</p>

<h3 id="old-vs-new">Old vs. New</h3>

<p>I may get a few details wrong, but here’s the gist of it.</p>

<p>Currently there are basically two ways to use OpenGL: the old way
(<em>compatibility profile</em>, fixed-function pipeline) and the new way
(<em>core profile</em>, programmable pipeline). The new API came about
because of a specific new capability that graphics cards gained years
after the original OpenGL specification was written. This is, modern
graphics cards are fully programmable. Programs can be compiled with
the GPU hardware as the target, allowing them to run directly on the
graphics card. The new API is oriented around running these programs
on the graphics card.</p>

<p>Before the programmable pipeline, graphics cards had a fixed set of
functionality for rendering 3D graphics. You tell it what
functionality you want to use, then hand it data little bits at a
time. Any functionality not provided by the GPU had to be done on the
CPU. The CPU ends of doing a lot of the work that would be better
suited for a GPU, in addition to spoon-feeding data to the GPU during
rendering.</p>

<p>With the programmable pipeline, you start by sending a program, called
a <em>shader</em>, to the GPU. At the application’s run-time, the graphics
driver takes care of compiling this shader, which is written in the
OpenGL Shading Language (GLSL). When it comes time to render a frame,
you prepare all the shader’s inputs in memory buffers on the GPU, then
issue a <em>draw</em> command to the GPU. The program output goes into
another buffer, probably to be treated as pixels for the screen. On
it’s own, the GPU processes the inputs in parallel <em>much</em> faster than a
CPU could ever do sequentially.</p>

<p>An <em>very</em> important detail to notice here is that, at a high level,
<strong>this process is almost orthogonal to the concept of rendering
graphics</strong>. The inputs to a shader are arbitrary data. The final
output is arbitrary data. The process is structured so that it’s
easily used to render graphics, but it’s not strictly required. It can
be used to perform arbitrary computations.</p>

<p>This paradigm shift in GPU architecture is the biggest barrier to
learning OpenGL. The apparent surface area of the API is doubled in
size because it includes the irrelevant, outdated parts. Sure, the
recent versions of OpenGL eschew the fixed-function API (3.1+), but
all of that mess still shows up when browsing and searching
documentation. Worse, <strong>there are still many tutorials that teach the
outdated API</strong>. In fact, as of this writing the first Google result
for “opengl tutorial” turns up one of these outdated tutorials.</p>

<h3 id="opengl-es-and-webgl">OpenGL ES and WebGL</h3>

<p>OpenGL for Embedded Systems (<a href="http://en.wikipedia.org/wiki/OpenGL_ES">OpenGL ES</a>) is a subset of OpenGL
specifically designed for devices like smartphones and tablet
computers. The OpenGL ES 2.0 specification removes the old
fixed-function APIs. What’s significant about this is that WebGL is
based on OpenGL ES 2.0. If the context a discussion is WebGL, you’re
guaranteed to not be talking about an outdated API. This indicator has
been a really handy way to filter out a lot of bad information.</p>

<p>In fact, I think <strong>the <a href="http://www.khronos.org/registry/webgl/specs/1.0/">WebGL specification</a> is probably the
best documentation root for exploring OpenGL</strong>. None of the outdated
functions are listed, most of the descriptions are written in plain
English, and they all link out to the official documentation if
clarification or elaboration is needed. As I was learning WebGL it was
easy to jump around this document to find what I needed.</p>

<p>This is also a reason to completely avoid spending time learning the
fixed-function pipeline. It’s incompatible with WebGL and many modern
platforms. Learning it would be about as useful as learning Latin when
your goal is to communicate with people from other parts of the world.</p>

<h3 id="the-fundamentals">The Fundamentals</h3>

<p>Now that WebGL allowed me to focus on the relevant parts of OpenGL, I
was able to spend effort into figuring out the important stuff that
the tutorials skip over. You see, even the tutorials that are using
the right pipeline still do a poor job. They skip over the
fundamentals and dive right into 3D graphics. This is a mistake.</p>

<p>I’m a firm believer that
<a href="http://www.skorks.com/2010/04/on-the-value-of-fundamentals-in-software-development/">mastery lies in having a solid grip on the fundamentals</a>.
The programmable pipeline has little built-in support for 3D graphics.
This is because <strong>OpenGL is at its essence <a href="http://www.html5rocks.com/en/tutorials/webgl/webgl_fundamentals/">a 2D API</a></strong>. The
vertex shader accepts <em>something</em> as input and it produces 2D vertices
in device coordinates (-1 to 1) as output. Projecting this <em>something</em>
to 2D is functionality you have to do yourself, because OpenGL won’t
be doing it for you. Realizing this one fact was what <em>really</em> made
everything click for me.</p>

<p><img src="/img/diagram/device-coordinates.png" alt="" /></p>

<p>Many of the tutorials try to handwave this part. “Just use this
library and this boilerplate so you can ignore this part,” they say,
quickly moving on to spinning a cube. This is sort of like using an
IDE for programming and having no idea how a build system works. This
works if you’re in a hurry to accomplish a specific task, but it’s no
way to achieve mastery.</p>

<p>More so, for me the step being skipped <em>is perhaps the most
interesting part of it all</em>! For example, after getting a handle on
how things worked — without copy-pasting any boilerplate around — I
ported <a href="/blog/2012/06/03/">my OpenCL 3D perlin noise generator</a> to GLSL.</p>

<ul>
  <li><a href="/perlin-noise/">/perlin-noise/</a>
(<a href="https://github.com/skeeto/perlin-noise/tree/master/webgl">source</a>)</li>
</ul>

<p><img src="/img/noise/octave-perlin2d.png" alt="" /></p>

<p>Instead of saving off each frame as an image, this just displays it in
real-time. The CPU’s <em>only</em> job is to ask the GPU to render a new
frame at a regular interval. Other than this, it’s entirely idle. All
the computation is being done by the GPU, and at speeds far greater
than a CPU could achieve.</p>

<p>Side note: you may notice some patterns in the noise. This is because,
as of this writing, I’m still working out decent a random number
generation in the fragment shader.</p>

<p>If your computer is struggling to display that page it’s because the
WebGL context is demanding more from your GPU than it can deliver. All
this GPU power is being put to use for something other than 3D
graphics! I think that’s far more interesting than a spinning 3D cube.</p>

<h3 id="spinning-3d-sphere">Spinning 3D Sphere</h3>

<p>However, speaking of 3D cubes, this sort of thing was actually my very
first WebGL project. To demonstrate the
<a href="/blog/2012/02/08/">biased-random-point-on-a-sphere</a> thing to a co-worker (outside
of work), I wrote a 3D HTML5 canvas plotter. I didn’t know WebGL yet.</p>

<ul>
  <li><a href="/sphere-js/?webgl=false">HTML5 Canvas 2D version</a>
(<a href="https://github.com/skeeto/sphere-js">source</a>) (ignore the warning)</li>
</ul>

<p>On a typical computer this can only handle about 4,000 points before
the framerate drops. In my effort to finally learn WebGL, I ported the
display to WebGL and GLSL. Remember that you have to bring your own 3D
projection to OpenGL? Since I had already worked all of that out for
the 2D canvas, this was just a straightforward port to GLSL. Except
for the colored axes, this looks identical to the 2D canvas version.</p>

<ul>
  <li><a href="/sphere-js/">WebGL version</a>
(a red warning means it’s not working right!)</li>
</ul>

<p><img src="/img/screenshot/sphere-js.png" alt="" /></p>

<p>This version can literally handle <em>millions</em> of points without
breaking a sweat. The difference is dramatic. Here’s 100,000 points in
each (any more points and it’s just a black sphere).</p>

<ul>
  <li><a href="/sphere-js/?n=100000">WebGL 100,000 points</a></li>
  <li><a href="/sphere-js/?n=100000&amp;webgl=false">Canvas 100,000 points</a></li>
</ul>

<h3 id="a-friendly-api">A Friendly API</h3>

<p>WebGL still three major advantages over other OpenGL bindings, all of
which make it a real joy to use.</p>

<h4 id="length-parameters">Length Parameters</h4>

<p>In C/C++ world, where the OpenGL specification lies, any function that
accepts an arbitrary-length buffer must also have an parameter for the
buffer’s size. Due to this, these functions tend to have a lot of
parameters! So in addition to OpenGL’s existing clunkiness there are
these length arguments to worry about.</p>

<p>Not so in WebGL! Since JavaScript is a type-safe language, the buffer
lengths are stored with the buffers themselves, so this parameter
completely disappears. This is also an advantage of Java’s lwjgl.</p>

<h4 id="resource-management">Resource Management</h4>

<p>Any time a shader, program, buffer, etc. is created, resources are
claimed on the GPU. Long running programs need to manage these
properly, destroying them before losing the handle on them. Otherwise
it’s a GPU leak.</p>

<p>WebGL ties GPU resource management to JavaScript’s garbage collector.
If a buffer is created and then let go, the GPU’s associated resources
will be freed at the same time as the wrapper object in JavaScript.
This can still be done explicitly if tight management is needed, but
the GC fallback is there if it’s not done.</p>

<p>Because this is untrusted code interacting with the GPU, this part is
essential for security reasons. JavaScript programs can’t leak GPU
resources, even intentionally.</p>

<p>Unlike the buffer length advantage, lwjgl does not do this. You still
need to manage GPU resources manually in Java, just as you would C.</p>

<h4 id="live-interaction">Live Interaction</h4>

<p>Perhaps most significantly of all, I can
<a href="https://github.com/skeeto/skewer-mode">drive WebGL interactively with Skewer</a>. If I expose shader
initialization properly, I can even update the shaders while the
display running. Before WebGL, live OpenGL interaction is something
that could only be achieved with the Common Lisp OpenGL bindings (as
far as I know).</p>

<p>It’s <em>really</em> cool to be able to manipulate an OpenGL context from
Emacs.</p>

<h3 id="the-future">The Future</h3>

<p>I’m expecting to do a lot more with WebGL in the future. I’m <em>really</em>
keeping my eye out for an opportunity to combine it with
<a href="/blog/2013/01/26/">distributed web computing</a>, but using the GPU instead of the
CPU. If I find a problem that fits this infrastructure well, this
system may be the first of its kind: visit a web page and let it use
your GPU to help solve some distributed computing problem!
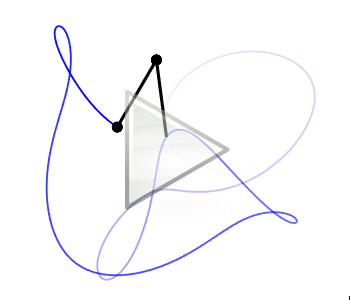
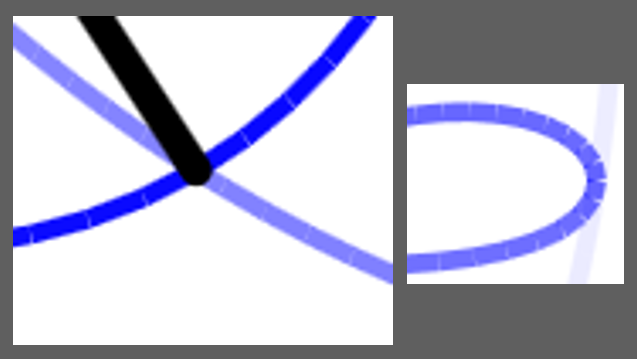
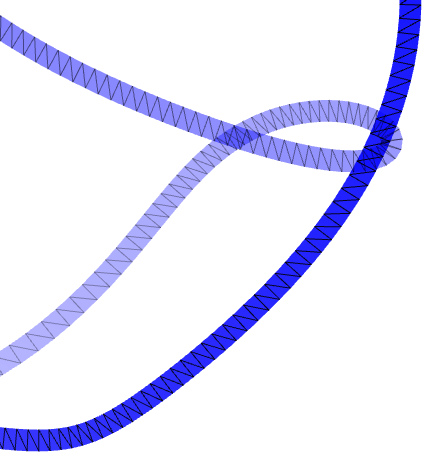
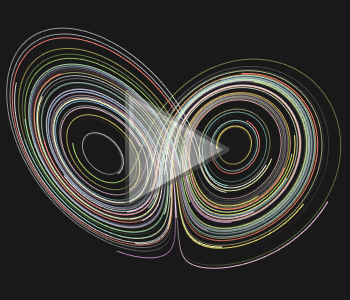
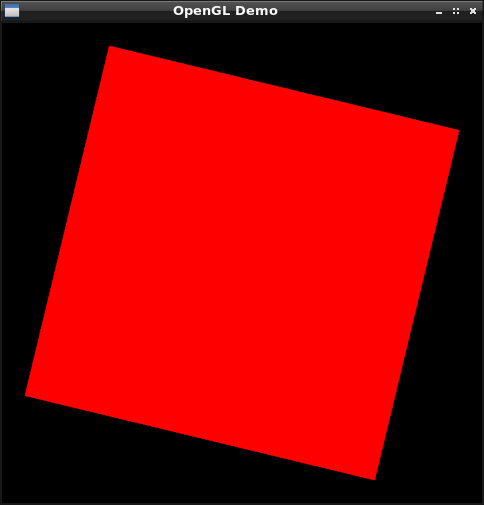
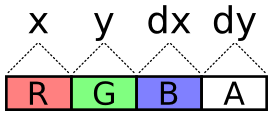
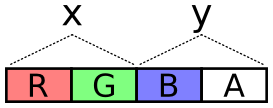
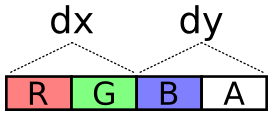
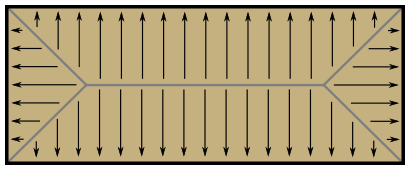
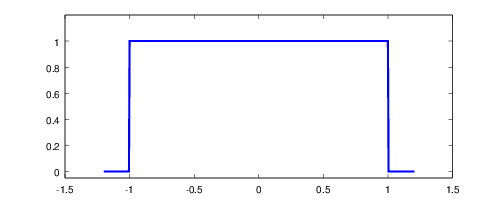
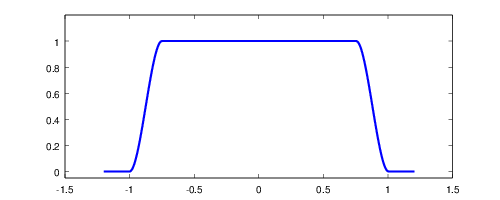
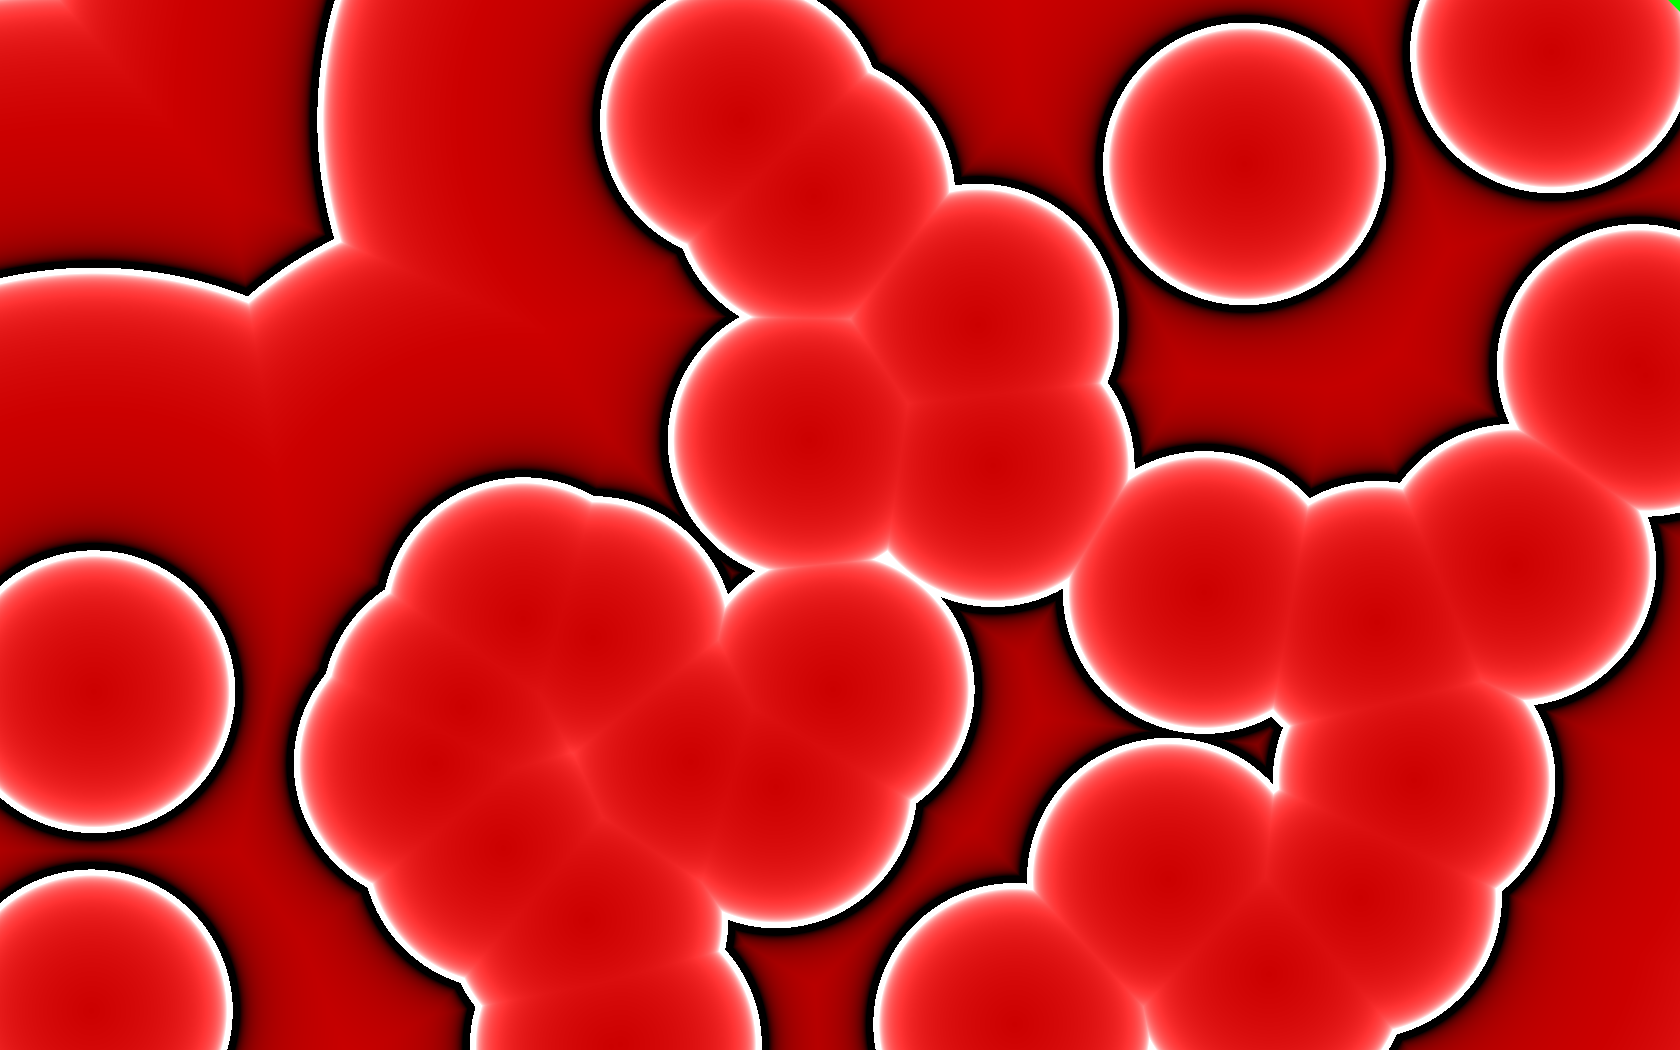
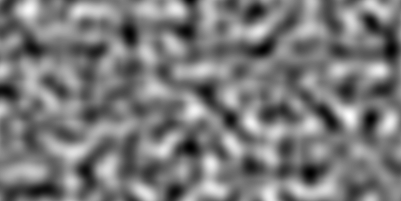
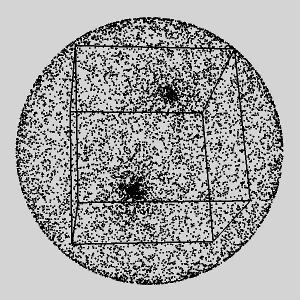
</p>

]]>
    </content>
  </entry>


</feed>
