nullprogram.com/blog/2014/06/29/
The next project in my GPGPU series is a particle physics
engine that computes the entire physics simulation on the GPU.
Particles are influenced by gravity and will bounce off scene
geometry. This WebGL demo uses a shader feature not strictly required
by the OpenGL ES 2.0 specification, so it may not work on some
platforms, especially mobile devices. It will be discussed later in
the article.
It’s interactive. The mouse cursor is a circular obstacle that the
particles bounce off of, and clicking will place a permanent obstacle
in the simulation. You can paint and draw structures through which the
the particles will flow.
Here’s an HTML5 video of the demo in action, which, out of necessity,
is recorded at 60 frames-per-second and a high bitrate, so it’s pretty
big. Video codecs don’t gracefully handle all these full-screen
particles very well and lower framerates really don’t capture the
effect properly. I also added some appropriate sound that you won’t
hear in the actual demo.
On a modern GPU, it can simulate and draw over 4 million particles
at 60 frames per second. Keep in mind that this is a JavaScript
application, I haven’t really spent time optimizing the shaders, and
it’s living within the constraints of WebGL rather than something more
suitable for general computation, like OpenCL or at least desktop
OpenGL.
Encoding Particle State as Color
Just as with the Game of Life and path finding
projects, simulation state is stored in pairs of textures and the
majority of the work is done by a fragment shader mapped between them
pixel-to-pixel. I won’t repeat myself with the details of setting this
up, so refer to the Game of Life article if you need to see how it
works.
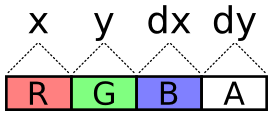
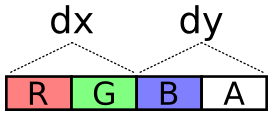
For this simulation, there are four of these textures instead of two:
a pair of position textures and a pair of velocity textures. Why pairs
of textures? There are 4 channels, so every one of these components
(x, y, dx, dy) could be packed into its own color channel. This seems
like the simplest solution.
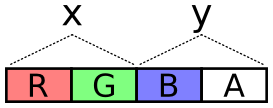
The problem with this scheme is the lack of precision. With the
R8G8B8A8 internal texture format, each channel is one byte. That’s 256
total possible values. The display area is 800 by 600 pixels, so not
even every position on the display would be possible. Fortunately, two
bytes, for a total of 65,536 values, is plenty for our purposes.
The next problem is how to encode values across these two channels. It
needs to cover negative values (negative velocity) and it should try
to take full advantage of dynamic range, i.e. try to spread usage
across all of those 65,536 values.
To encode a value, multiply the value by a scalar to stretch it over
the encoding’s dynamic range. The scalar is selected so that the
required highest values (the dimensions of the display) are the
highest values of the encoding.
Next, add half the dynamic range to the scaled value. This converts
all negative values into positive values with 0 representing the
lowest value. This representation is called Excess-K. The
downside to this is that clearing the texture (glClearColor) with
transparent black no longer sets the decoded values to 0.
Finally, treat each channel as a digit of a base-256 number. The
OpenGL ES 2.0 shader language has no bitwise operators, so this is
done with plain old division and modulus. I made an encoder and
decoder in both JavaScript and GLSL. JavaScript needs it to write the
initial values and, for debugging purposes, so that it can read back
particle positions.
vec2 encode(float value) {
    value = value * scale + OFFSET;
    float x = mod(value, BASE);
    float y = floor(value / BASE);
    return vec2(x, y) / BASE;
}

float decode(vec2 channels) {
    return (dot(channels, vec2(BASE, BASE * BASE)) - OFFSET) / scale;
}
And JavaScript. Unlike normalized GLSL values above (0.0-1.0), this
produces one-byte integers (0-255) for packing into typed arrays.
function encode(value, scale) {
    var b = Particles.BASE;
    value = value * scale + b * b / 2;
    var pair = [
        Math.floor((value % b) / b * 255),
        Math.floor(Math.floor(value / b) / b * 255)
    ];
    return pair;
}

function decode(pair, scale) {
    var b = Particles.BASE;
    return (((pair[0] / 255) * b +
             (pair[1] / 255) * b * b) - b * b / 2) / scale;
}
The fragment shader that updates each particle samples the position
and velocity textures at that particle’s “index”, decodes their
values, operates on them, then encodes them back into a color for
writing to the output texture. Since I’m using WebGL, which lacks
multiple rendering targets (despite having support for gl_FragData),
the fragment shader can only output one color. Position is updated in
one pass and velocity in another as two separate draws. The buffers
are not swapped until after both passes are done, so the velocity
shader (intentionally) doesn’t uses the updated position values.
There’s a limit to the maximum texture size, typically 8,192 or 4,096,
so rather than lay the particles out in a one-dimensional texture, the
texture is kept square. Particles are indexed by two-dimensional
coordinates.
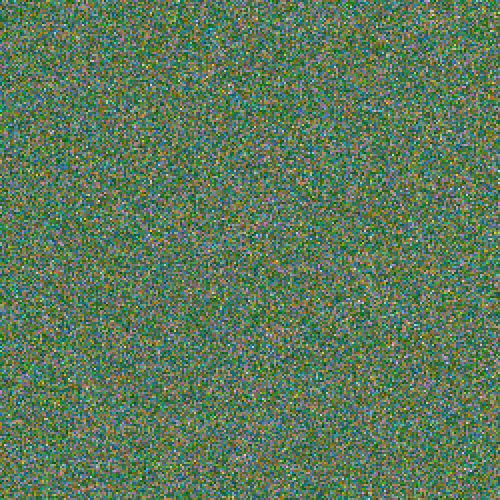
It’s pretty interesting to see the position or velocity textures drawn
directly to the screen rather than the normal display. It’s another
domain through which to view the simulation, and it even helped me
identify some issues that were otherwise hard to see. The output is a
shimmering array of color, but with definite patterns, revealing a lot
about the entropy (or lack thereof) of the system. I’d share a video
of it, but it would be even more impractical to encode than the normal
display. Here are screenshots instead: position, then velocity. The
alpha component is not captured here.
Entropy Conservation
One of the biggest challenges with running a simulation like this on a
GPU is the lack of random values. There’s no rand() function in the
shader language, so the whole thing is deterministic by default. All
entropy comes from the initial texture state filled by the CPU. When
particles clump up and match state, perhaps from flowing together over
an obstacle, it can be difficult to work them back apart since the
simulation handles them identically.
To mitigate this problem, the first rule is to conserve entropy
whenever possible. When a particle falls out of the bottom of the
display, it’s “reset” by moving it back to the top. If this is done by
setting the particle’s Y value to 0, then information is destroyed.
This must be avoided! Particles below the bottom edge of the display
tend to have slightly different Y values, despite exiting during the
same iteration. Instead of resetting to 0, a constant value is added:
the height of the display. The Y values remain different, so these
particles are more likely to follow different routes when bumping into
obstacles.
The next technique I used is to supply a single fresh random value via
a uniform for each iteration This value is added to the position and
velocity of reset particles. The same value is used for all particles
for that particular iteration, so this doesn’t help with overlapping
particles, but it does help to break apart “streams”. These are
clearly-visible lines of particles all following the same path. Each
exits the bottom of the display on a different iteration, so the
random value separates them slightly. Ultimately this stirs in a few
bits of fresh entropy into the simulation on each iteration.
Alternatively, a texture containing random values could be supplied to
the shader. The CPU would have to frequently fill and upload the
texture, plus there’s the issue of choosing where to sample the
texture, itself requiring a random value.
Finally, to deal with particles that have exactly overlapped, the
particle’s unique two-dimensional index is scaled and added to the
position and velocity when resetting, teasing them apart. The random
value’s sign is multiplied by the index to avoid bias in any
particular direction.
To see all this in action in the demo, make a big bowl to capture all
the particles, getting them to flow into a single point. This removes
all entropy from the system. Now clear the obstacles. They’ll all fall
down in a single, tight clump. It will still be somewhat clumped when
resetting at the top, but you’ll see them spraying apart a little bit
(particle indexes being added). These will exit the bottom at slightly
different times, so the random value plays its part to work them apart
even more. After a few rounds, the particles should be pretty evenly
spread again.
The last source of entropy is your mouse. When you move it through the
scene you disturb particles and introduce some noise to the
simulation.
Textures as Vertex Attribute Buffers
This project idea occurred to me while reading the OpenGL ES shader
language specification (PDF). I’d been wanting to do a particle
system, but I was stuck on the problem how to draw the particles. The
texture data representing positions needs to somehow be fed back into
the pipeline as vertices. Normally a buffer texture — a texture
backed by an array buffer — or a pixel buffer object —
asynchronous texture data copying — might be used for this, but WebGL
has none these features. Pulling texture data off the GPU and putting
it all back on as an array buffer on each frame is out of the
question.
However, I came up with a cool technique that’s better than both those
anyway. The shader function texture2D is used to sample a pixel in a
texture. Normally this is used by the fragment shader as part of the
process of computing a color for a pixel. But the shader language
specification mentions that texture2D is available in vertex
shaders, too. That’s when it hit me. The vertex shader itself can
perform the conversion from texture to vertices.
It works by passing the previously-mentioned two-dimensional particle
indexes as the vertex attributes, using them to look up particle
positions from within the vertex shader. The shader would run in
GL_POINTS mode, emitting point sprites. Here’s the abridged version,
attribute vec2 index;

uniform sampler2D positions;
uniform vec2 statesize;
uniform vec2 worldsize;
uniform float size;

// float decode(vec2) { ...

void main() {
    vec4 psample = texture2D(positions, index / statesize);
    vec2 p = vec2(decode(psample.rg), decode(psample.ba));
    gl_Position = vec4(p / worldsize * 2.0 - 1.0, 0, 1);
    gl_PointSize = size;
}
The real version also samples the velocity since it modulates the
color (slow moving particles are lighter than fast moving particles).
However, there’s a catch: implementations are allowed to limit the
number of vertex shader texture bindings to 0
(GL_MAX_VERTEX_TEXTURE_IMAGE_UNITS). So technically vertex shaders
must always support texture2D, but they’re not required to support
actually having textures. It’s sort of like food service on an
airplane that doesn’t carry passengers. These platforms don’t support
this technique. So far I’ve only had this problem on some mobile
devices.
Outside of the lack of support by some platforms, this allows every
part of the simulation to stay on the GPU and paves the way for a pure
GPU particle system.
Obstacles
An important observation is that particles do not interact with each
other. This is not an n-body simulation. They do, however, interact
with the rest of the world: they bounce intuitively off those static
circles. This environment is represented by another texture, one
that’s not updated during normal iteration. I call this the obstacle
texture.
The colors on the obstacle texture are surface normals. That is, each
pixel has a direction to it, a flow directing particles in some
direction. Empty space has a special normal value of (0, 0). This is
not normalized (doesn’t have a length of 1), so it’s an out-of-band
value that has no effect on particles.
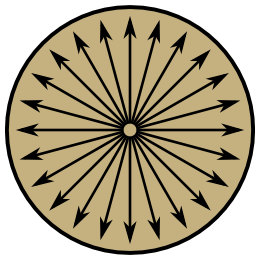
(I didn’t realize until I was done how much this looks like the
Greendale Community College flag.)
A particle checks for a collision simply by sampling the obstacle
texture. If it finds a normal at its location, it changes its velocity
using the shader function reflect. This function is normally used
for reflecting light in a 3D scene, but it works equally well for
slow-moving particles. The effect is that particles bounce off the the
circle in a natural way.
Sometimes particles end up on/in an obstacle with a low or zero
velocity. To dislodge these they’re given a little nudge in the
direction of the normal, pushing them away from the obstacle. You’ll
see this on slopes where slow particles jiggle their way down to
freedom like jumping beans.
To make the obstacle texture user-friendly, the actual geometry is
maintained on the CPU side of things in JavaScript. It keeps a list of
these circles and, on updates, redraws the obstacle texture from this
list. This happens, for example, every time you move your mouse on the
screen, providing a moving obstacle. The texture provides
shader-friendly access to the geometry. Two representations for two
purposes.
When I started writing this part of the program, I envisioned that
shapes other than circles could place placed, too. For example, solid
rectangles: the normals would look something like this.
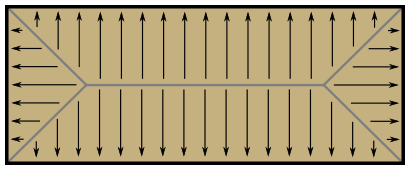
So far these are unimplemented.
Future Ideas
I didn’t try it yet, but I wonder if particles could interact with
each other by also drawing themselves onto the obstacles texture. Two
nearby particles would bounce off each other. Perhaps the entire
liquid demo could run on the GPU like this. If I’m imagining
it correctly, particles would gain volume and obstacles forming bowl
shapes would fill up rather than concentrate particles into a single
point.
I think there’s still some more to explore with this project.