nullprogram.com/blog/2018/02/15/
I’ve put together two online, interactive, demonstrations of chaotic
motion. One is 2D and the other is 3D, but both are rendered
using WebGL — which, for me, is the most interesting part.
Both are governed by ordinary differential equations. Both are
integrated using the Runge–Kutta method, specifically RK4.
Far more knowledgeable people have already written introductions for
chaos theory, so here’s just a quick summary. A chaotic system is
deterministic but highly sensitive to initial conditions. Tweaking a
single bit of the starting state of either of my demos will quickly
lead to two arbitrarily different results. Both demonstrations have
features that aim to show this in action.
This ain’t my first chaotic system rodeo. About eight years ago I made
water wheel Java applet, and that was based on some Matlab code I
collaborated on some eleven years ago. I really hope you’re not equipped
to run a crusty old Java applet in 2018, though. (Update: now
upgraded to HTML5 Canvas.)
If you want to find either of these demos again in the future, you
don’t need to find this article first. They’re both listed in my
Showcase page, linked from the header of this site.
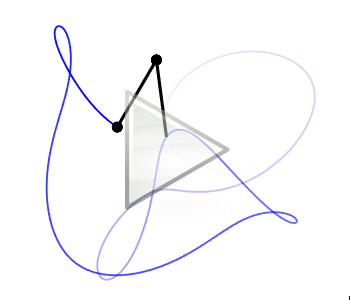
Double pendulum
First up is the classic double pendulum. This one’s more intuitive
than my other demo since it’s modeling a physical system you could
actually build and observe in the real world.
Source: https://github.com/skeeto/double-pendulum
I lifted the differential equations straight from the Wikipedia article
(derivative() in my code). Same for the Runge–Kutta method (rk4() in
my code). It’s all pretty straightforward. RK4 may not have been the
best choice for this system since it seems to bleed off energy over
time. If you let my demo run over night, by morning there will obviously
be a lot less activity.
I’m not a fan of buttons and other fancy GUI widgets — neither
designing them nor using them myself — prefering more cryptic, but
easy-to-use keyboard-driven interfaces. (Hey, it works well for
mpv and MPlayer.) I haven’t bothered with a mobile
interface, so sorry if you’re reading on your phone. You’ll just have
to enjoy watching a single pendulum.
Here are the controls:
- a: add a new random pendulum
- c: imperfectly clone an existing pendulum
- d: delete the most recently added pendulum
- m: toggle between WebGL and Canvas rendering
- SPACE: pause the simulation (toggle)
To witness chaos theory in action:
- Start with a single pendulum (the default).
- Pause the simulation (SPACE).
- Make a dozen or so clones (press c for awhile).
- Unpause.
At first it will appear as single pendulum, but they’re actually all
stacked up, each starting from slightly randomized initial conditions.
Within a minute you’ll witness the pendulums diverge, and after a minute
they’ll all be completely different. It’s pretty to watch them come
apart at first.
It might appear that the m key doesn’t actually do
anything. That’s because the HTML5 Canvas rendering — which is what I
actually implemented first — is really close to the WebGL rendering.
I’m really proud of this. There are just three noticeable differences.
First, there’s a rounded line cap in the Canvas rendering where the
pendulum is “attached.” Second, the tail line segments aren’t properly
connected in the Canvas rendering. The segments are stroked separately
in order to get that gradient effect along its path. Third, it’s a lot
slower, particularly when there are many pendulums to render.
In WebGL the two “masses” are rendered using that handy old circle
rasterization technique on a quad. Either a triangle fan
or pre-rendering the circle as a texture would probably have been a
better choices. The two bars are the same quad buffers, just squeezed
and rotated into place. Both were really simple to create. It’s the
tail that was tricky to render.
When I wrote the original Canvas renderer, I set the super convenient
lineWidth property to get a nice, thick tail. In my first cut at
rendering the tail I used GL_LINE_STRIP to draw a line primitive.
The problem with the line primitive is that an OpenGL implementation
is only required to support single pixel wide lines. If I wanted
wider, I’d have to generate the geometry myself. So I did.
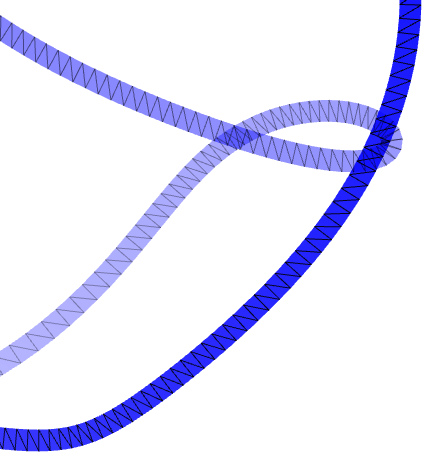
Like before, I wasn’t about to dirty my hands manipulating a
graphite-filled wooden stick on a piece of paper to solve this
problem. No, I lifted the math from something I found on the internet
again. In this case it was a forum post by paul.houx, which
provides a few vector equations to compute a triangle strip from a
line strip. My own modification was to add a miter limit, which keeps
sharp turns under control. You can find my implementation in
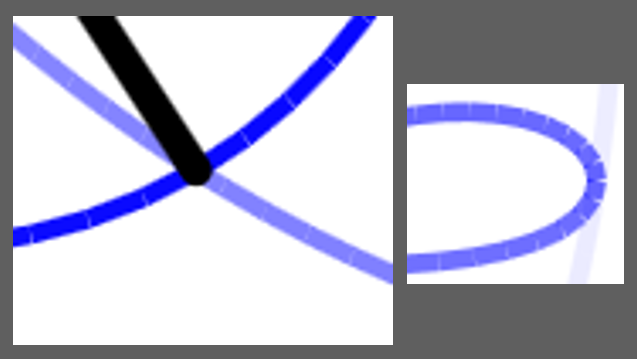
polyline() in my code. Here’s a close-up with the skeleton rendered
on top in black:
For the first time I’m also using ECMAScript’s new template
literals to store the shaders inside the JavaScript source. These
string literals can contain newlines, but, even cooler, I it does
string interpolation, meaning I can embed JavaScript variables
directly into the shader code:
let massRadius = 0.12;
let vertexShader = `
attribute vec2 a_point;
uniform   vec2 u_center;
varying   vec2 v_point;

void main() {
    v_point = a_point;
    gl_Position = vec4(a_point * ${massRadius} + u_center, 0, 1);
}`;
Allocation avoidance
If you’ve looked at my code you might have noticed something curious.
I’m using a lot of destructuring assignments, which is another
relatively new addition to ECMAScript. This was part of a little
experiment.
function normalize(v0, v1) {
    let d = Math.sqrt(v0 * v0 + v1 * v1);
    return [v0 / d, v1 / d];
}

/* ... */

let [nx, ny] = normalize(-ly, lx);
One of my goals for this project was zero heap allocations in the
main WebGL rendering loop. There are no garbage collector hiccups
if there’s no garbage to collect. This sort of thing is trivial
in a language with manual memory management, such as C and C++. Just
having value semantics for aggregates would be sufficient.
But with JavaScript I don’t get to choose how my objects are allocated.
I either have to pre-allocate everything, including space for all the
intermediate values (e.g. an object pool). This would be clunky and
unconventional. Or I can structure and access my allocations in such a
way that the JIT compiler can eliminate them (via escape analysis,
scalar replacement, etc.).
In this case, I’m trusting that JavaScript implementations will
flatten these destructuring assignments so that the intermediate array
never actually exists. It’s like pretending the array has value
semantics. This seems to work as I expect with V8, but not so well
with SpiderMonkey (yet?), at least in Firefox 52 ESR.
Single precision
I briefly considered using Math.fround() to convince
JavaScript to compute all the tail geometry in single precision. The
double pendulum system would remain double precision, but the geometry
doesn’t need all that precision. It’s all rounded to single precision
going out to the GPU anyway.
Normally when pulling values from a Float32Array, they’re cast to
double precision — JavaScript’s only numeric type — and all operations
are performed in double precision, even if the result is stored back
in a Float32Array. This is because the JIT compiler is required to
correctly perform all the intermediate rounding. To relax this
requirement, surround each operation with a call to
Math.fround(). Since the result of doing each operation in
double precision with this rounding step in between is equivalent to
doing each operation in single precision, the JIT compiler can choose
to do the latter.
let x = new Float32Array(n);
let y = new Float32Array(n);
let d = new Float32Array(n);
// ...
for (let i = 0; i < n; i++) {
    let xprod = Math.fround(x[i] * x[i]);
    let yprod = Math.fround(y[i] * y[i]);
    d[i] = Math.sqrt(Math.fround(xprod + yprod));
}
I ultimately decided not to bother with this since it would
significantly obscures my code for what is probably a minuscule
performance gain (in this case). It’s also really difficult to tell if
I did it all correctly. So I figure this is better suited for
compilers that target JavaScript rather than something to do by hand.
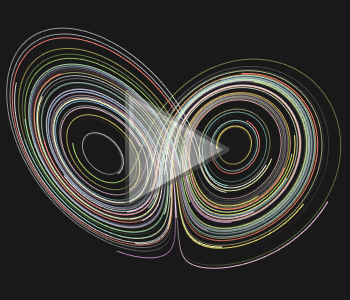
Lorenz system
The other demo is a Lorenz system with its famous butterfly
pattern. I actually wrote this one a year and a half ago but never got
around to writing about it. You can tell it’s older because I’m still
using var.
Source: https://github.com/skeeto/lorenz-webgl
Like before, the equations came straight from the Wikipedia article
(Lorenz.lorenz() in my code). They math is a lot simpler this time,
too.
This one’s a bit more user friendly with a side menu displaying all
your options. The keys are basically the same. This was completely by
accident, I swear. Here are the important ones:
- a: add a new random solution
- c: clone a solution with a perturbation
- C: remove all solutions
- SPACE: toggle pause/unpause
- You can click, drag, and toss it to examine it in 3D
Witnessing chaos theory in action is the same process as before: clear
it down to a single solution (C then a), then add
a bunch of randomized clones (c).
There is no Canvas renderer for this one. It’s pure WebGL. The tails are
drawn using GL_LINE_STRIP, but in this case it works fine that they’re
a single pixel wide. If heads are turned on, those are just GL_POINT.
The geometry is threadbare for this one.
There is one notable feature: The tails are stored exclusively in
GPU memory. Only the “head” is stored CPU-side. After it computes
the next step, it updates a single spot of the tail with
glBufferSubData(), and the VBO is actually a circular buffer. OpenGL
doesn’t directly support rendering from circular buffers, but it
does have element arrays. An element array is an additional buffer
of indices that tells OpenGL what order to use the elements in the
other buffers.
Naively would mean for a tail of 4 segments, I need 4 different
element arrays, one for each possible rotation:
array 0: 0 1 2 3
array 1: 1 2 3 0
array 2: 2 3 0 1
array 3: 3 0 1 2
With the knowledge that element arrays can start at an offset, and
with a little cleverness, you might notice these can all overlap in a
single, 7-element array:
Array 0 is at offset 0, array 1 is at offset 1, array 2 is at offset 2,
and array 3 is at offset 3. The tails in the Lorenz system are drawn
using drawElements() with exactly this sort of array.
Like before, I was very careful to produce zero heap allocations in the
main loop. The FPS counter generates some garbage in the DOM due to
reflow, but this goes away if you hide the help menu (?). This
was long enough ago that destructuring assignment wasn’t available, but
Lorenz system and rendering it were so simple that using pre-allocated
objects worked fine.
Beyond just the programming, I’ve gotten hours of entertainment
playing with each of these systems. This was also the first time I’ve
used WebGL in over a year, and this project was a reminder of just how
working with it is so pleasurable. The specification is
superbly written and serves perfectly as its own reference.