nullprogram.com/blog/2014/06/21/
The biggest flaw with so many OpenGL tutorials is trying to teach two
complicated topics at once: the OpenGL API and 3D graphics. These are
only loosely related and do not need to be learned simultaneously.
It’s far more valuable to focus on the fundamentals, which can
only happen when handled separately. With the programmable pipeline,
OpenGL is useful for a lot more than 3D graphics. There are many
non-3D directions that tutorials can take.
I think that’s why I’ve been enjoying my journey through WebGL so
much. Except for my sphere demo, which was only barely 3D,
none of my projects have been what would typically be
considered 3D graphics. Instead, each new project has introduced me to
some new aspect of OpenGL, accidentally playing out like a great
tutorial. I started out drawing points and lines, then took a dive
into non-trivial fragment shaders, then textures and
framebuffers, then the depth buffer, then general
computation with fragment shaders.
The next project introduced me to alpha blending. I ported my old
feedback applet to WebGL!
Since finishing the port I’ve already spent a couple of hours just
playing with it. It’s mesmerizing. Here’s a video demonstration in
case WebGL doesn’t work for you yet. I’m manually driving it to show
off the different things it can do.
Drawing a Frame
On my laptop, the original Java version plods along at about 6 frames
per second. That’s because it does all of the compositing on the CPU.
Each frame it has to blend over 1.2 million color components. This is
exactly the sort of thing the GPU is built to do. The WebGL version
does the full 60 frames per second (i.e. requestAnimationFrame)
without breaking a sweat. The CPU only computes a couple of 3x3 affine
transformation matrices per frame: virtually nothing.
Similar to my WebGL Game of Life, there’s texture stored on the
GPU that holds almost all the system state. It’s the same size as the
display. To draw the next frame, this texture is drawn to the display
directly, then transformed (rotated and scaled down slightly), and
drawn again to the display. This is the “feedback” part and it’s where
blending kicks in. It’s the core component of the whole project.
Next, some fresh shapes are drawn to the display (i.e. the circle for
the mouse cursor) and the entire thing is captured back onto the state
texture with glCopyTexImage2D, to be used for the next frame. It’s
important that glCopyTexImage2D is called before returning to the
JavaScript top-level (back to the event loop), because the screen data
will no longer be available at that point, even if it’s still visible
on the screen.
Alpha Blending
They say a picture is worth a thousand words, and that’s literally
true with the Visual glBlendFunc + glBlendEquation Tool. A
few minutes playing with that tool tells you pretty much everything
you need to know.
While you could potentially perform blending yourself in a fragment
shader with multiple draw calls, it’s much better (and faster) to
configure OpenGL to do it. There are two functions to set it up:
glBlendFunc and glBlendEquation. There are also “separate”
versions of all this for specifying color channels separately, but I
don’t need that for this project.
The enumeration passed to glBlendFunc decides how the colors are
combined. In WebGL our options are GL_FUNC_ADD (a + b),
GL_FUNC_SUBTRACT (a - b), GL_FUNC_REVERSE_SUBTRACT (b - a). In
regular OpenGL there’s also GL_MIN (min(a, b)) and GL_MAX (max(a,
b)).
The function glBlendEquation takes two enumerations, choosing how
the alpha channels are applied to the colors before the blend function
(above) is applied. The alpha channel could be ignored and the color
used directly (GL_ONE) or discarded (GL_ZERO). The alpha channel
could be multiplied directly (GL_SRC_ALPHA, GL_DST_ALPHA), or
inverted first (GL_ONE_MINUS_SRC_ALPHA). In WebGL there are 72
possible combinations.
gl.enable(gl.BLEND);
gl.blendEquation(gl.FUNC_ADD);
gl.blendFunc(gl.SRC_ALPHA, gl.SRC_ALPHA);
In this project I’m using GL_FUNC_ADD and GL_SRC_ALPHA for both
source and destination. The alpha value put out by the fragment shader
is the experimentally-determined, magical value of 0.62. A little
higher and the feedback tends to blend towards bright white really
fast. A little lower and it blends away to nothing really fast. It’s a
numerical instability that has the interesting side effect of making
the demo behave slightly differently depending on the floating
point precision of the GPU running it!
Saving a Screenshot
The HTML5 canvas object that provides the WebGL context has a
toDataURL() method for grabbing the canvas contents as a friendly
base64-encoded PNG image. Unfortunately this doesn’t work with WebGL
unless the preserveDrawingBuffer options is set, which can introduce
performance issues. Without this option, the browser is free to throw
away the drawing buffer before the next JavaScript turn, making the
pixel information inaccessible.
By coincidence there’s a really convenient workaround for this
project. Remember that state texture? That’s exactly what we want to
save. I can attach it to a framebuffer and use glReadPixels just
like did in WebGL Game of Life to grab the simulation state. The pixel
data is then drawn to a background canvas (without using WebGL) and
toDataURL() is used on that canvas to get a PNG image. I slap this
on a link with the new download attribute and call it done.
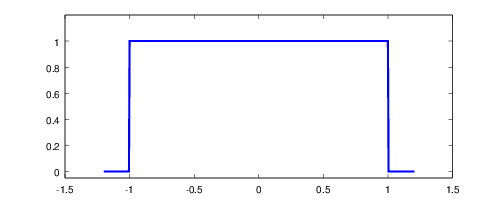
Anti-aliasing
At the time of this writing, support for automatic anti-aliasing in
WebGL is sparse at best. I’ve never seen it working anywhere yet, in
any browser on any platform. GL_SMOOTH isn’t available and the
anti-aliasing context creation option doesn’t do anything on any of my
computers. Fortunately I was able to work around this using a cool
smoothstep trick.
The article I linked explains it better than I could, but here’s the
gist of it. This shader draws a circle in a quad, but leads to jagged,
sharp edges.
uniform vec4 color;
varying vec3 coord;  // object space

void main() {
    if (distance(coord.xy, vec2(0, 0)) < 1.0) {
        gl_FragColor = color;
    } else {
        gl_FragColor = vec4(0, 0, 0, 1);
    }
}
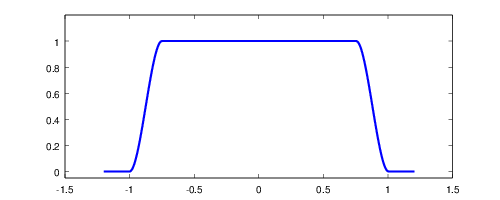
The improved version uses smoothstep to fade from inside the circle
to outside the circle. Not only does it look nicer on the screen, I
think it looks nicer as code, too. Unfortunately WebGL has no fwidth
function as explained in the article, so the delta is hardcoded.
uniform vec4 color;
varying vec3 coord;

const vec4 outside = vec4(0, 0, 0, 1);
const float delta = 0.1;

void main() {
    float dist = distance(coord.xy, vec2(0, 0));
    float a = smoothstep(1.0 - delta, 1.0, dist);
    gl_FragColor = mix(color, outside, a);
}
Up until this point I had avoided matrix uniforms. I was doing
transformations individually within the shader. However, as transforms
get more complicated, it’s much better to express the transform as a
matrix and let the shader language handle matrix multiplication
implicitly. Rather than pass half a dozen uniforms describing the
transform, you pass a single matrix that has the full range of motion.
My Igloo WebGL library originally had a vector library that
provided GLSL-style vectors, including full swizzling. My long term
goal was to extend this to support GLSL-style matrices. However,
writing a matrix library from scratch was turning out to be far more
work than I expected. Plus it’s reinventing the wheel.
So, instead, I dropped my vector library — I completely deleted it —
and decided to use glMatrix, a really solid
WebGL-friendly matrix library. Highly recommended! It doesn’t
introduce any new types, it just provides functions for operating on
JavaScript typed arrays, the same arrays that get passed directly to
WebGL functions. This composes perfectly with Igloo without making it
a formal dependency.
Here’s my function for creating the mat3 uniform that transforms both
the main texture as well as the individual shape sprites. This use of
glMatrix looks a lot like java.awt.geom.AffineTransform, does it
not? That’s one of my favorite parts of Java 2D, and I’ve been
missing it.
/* Translate, scale, and rotate. */
Feedback.affine = function(tx, ty, sx, sy, a) {
    var m = mat3.create();
    mat3.translate(m, m, [tx, ty]);
    mat3.rotate(m, m, a);
    mat3.scale(m, m, [sx, sy]);
    return m;
};
The return value is just a plain Float32Array that I can pass to
glUniformMatrix3fv. It becomes the placement uniform in the
shader.
attribute vec2 quad;
uniform mat3 placement;
varying vec3 coord;

void main() {
    coord = vec3(quad, 0);
    vec2 position = (placement * vec3(quad, 1)).xy;
    gl_Position = vec4(position, 0, 1);
}
To move to 3D graphics from here, I would just need to step up to a
mat4 and operate on 3D coordinates instead of 2D. glMatrix would still
do the heavy lifting on the CPU side. If this was part of an OpenGL
tutorial series, perhaps that’s how it would transition to the next
stage.
Conclusion
I’m really happy with how this one turned out. The only way it’s
indistinguishable from the original applet is that it runs faster. In
preparation for this project, I made a big pile of improvements to
Igloo, bringing it up to speed with my current WebGL knowledge. This
will greatly increase the speed at which I can code up and experiment
with future projects. WebGL + Skewer + Igloo has really
become a powerful platform for rapid prototyping with OpenGL.